Our WordPress plugin, Simple Calendar helps effortlessly integrate Google Calendar into your WordPress site. Yet, we have further trimmed down this effortless process to almost zero step requirements at your end.
Yes, let’s welcome our “OAuth Helper addon” for the users of our Google Calendar Pro or FullCalendar add-on! It is a powerful add-on designed to streamline the integration of public and private Google Calendars with your WordPress site. This tool simplifies the otherwise complex authentication process required by Google.
It trims the lengthy authentication process and reduces 10+ steps to almost 2-3 steps. Hurry up, its Beta release offer of 50% off might end soon.
C’mon, let’s check how Simple Calendar’s OAuth Helper helps developers and businesses (whether it’s B2B or B2C) to facilitate their website authentication steps and also shorten the process. Many WordPress site owners are reaping the benefits of it at a very high level to increase business ROI. Does it sound interesting to you?
If yes, then learn more about our OAuth Helper. In this blog, we are elucidating the in-depth knowledge of the plugin. You’ll discover:
- OAuth vs. OAuth Helper
- Importance of seamless integration
- Why OAuth Helper?
- How does OAuth authentication benefit various industries?
- Get started with the Simple Calendar OAuth Helper add-on
OAuth vs. OAuth Helper
What is OAuth?
Let’s learn what OAuth is from a simple example below!
Suppose you have a house with a lock that requires a special key. You want to let a friend water your plants while you’re away, but you don’t want to give them the key to your house.
OAuth (Open Authorization) is like creating a special key that only opens the door to your plant room, not the entire house. This way, your friend can water your plants without having access to anywhere else.
It works similarly for online services and apps. When you use an app that needs to access information from another service (like your calendar or email), OAuth allows that app to access only the specific information it needs, without giving it your password or full access to your account.
Thus, your credentials remain safe even if the third-party app (that needed your access) suffers a breach. And, here’s the DEFINITION OF OAuth:
OAuth is an open-standard authentication protocol that allows you to authorize applications to interact on your behalf without sharing your password.
It includes roles like the Resource Owner (user), the Client (application wanting access), the Resource Server (server hosting the user data), and the Authorization Server (server issuing access tokens after proper authentication).
What is OAuth Helper?
HOWEVER, it isn’t a formal term recognized in OAuth standards!
BUT,
(We’ve named our Simple Calendar add-on OAuth Helper to represent its functionality at its best)
So, this is how we will define OAuth Helper in generic terms:
It refers to tools, libraries, or utilities that facilitate the implementation of OAuth in applications. They are designed to make it easier to integrate OAuth into existing applications by handling common tasks such as:
- Creating and managing the complexity of the OAuth flow.
- Generating, refreshing, and managing access tokens.
- Providing simplified interfaces to abstract the underlying protocol details from the developer.
In summary, while OAuth is a protocol specification for authorization, OAuth Helpers are tools or libraries designed to simplify the implementation of OAuth in various applications (which is Simple Calendar in our case).
Many people have started downloading this plugin just to leverage its’ innovation for their WordPress sites. We love it when they share with us that they’re getting outstanding results as compared to their previous tedious authentication process for their sites.
Simple Calendar add-on: OAuth Helper
We’re glad that we are offering meaningful detailed information through this guide.
OAuth Helper is an add-on released by Simple Calendar in its beta version to ease the OAuth authentication process. It has reduced the cumbersome Google authentication setup, making it user-friendly and accessible even for non-technical users.
This add-on uses the standard OAuth 2.0 protocol to ensure secure authentication. It includes the following process:
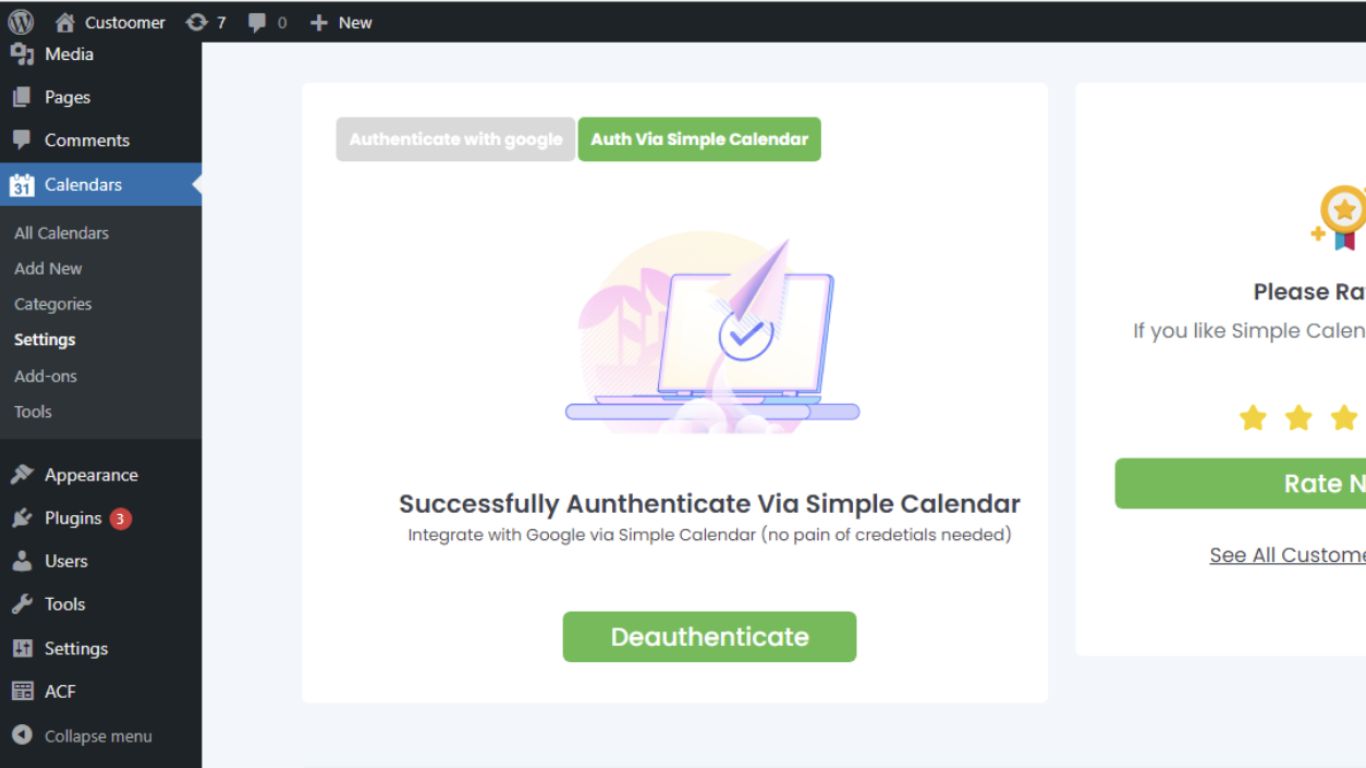
- The user clicks on Authenticate via Simple Calendar button.
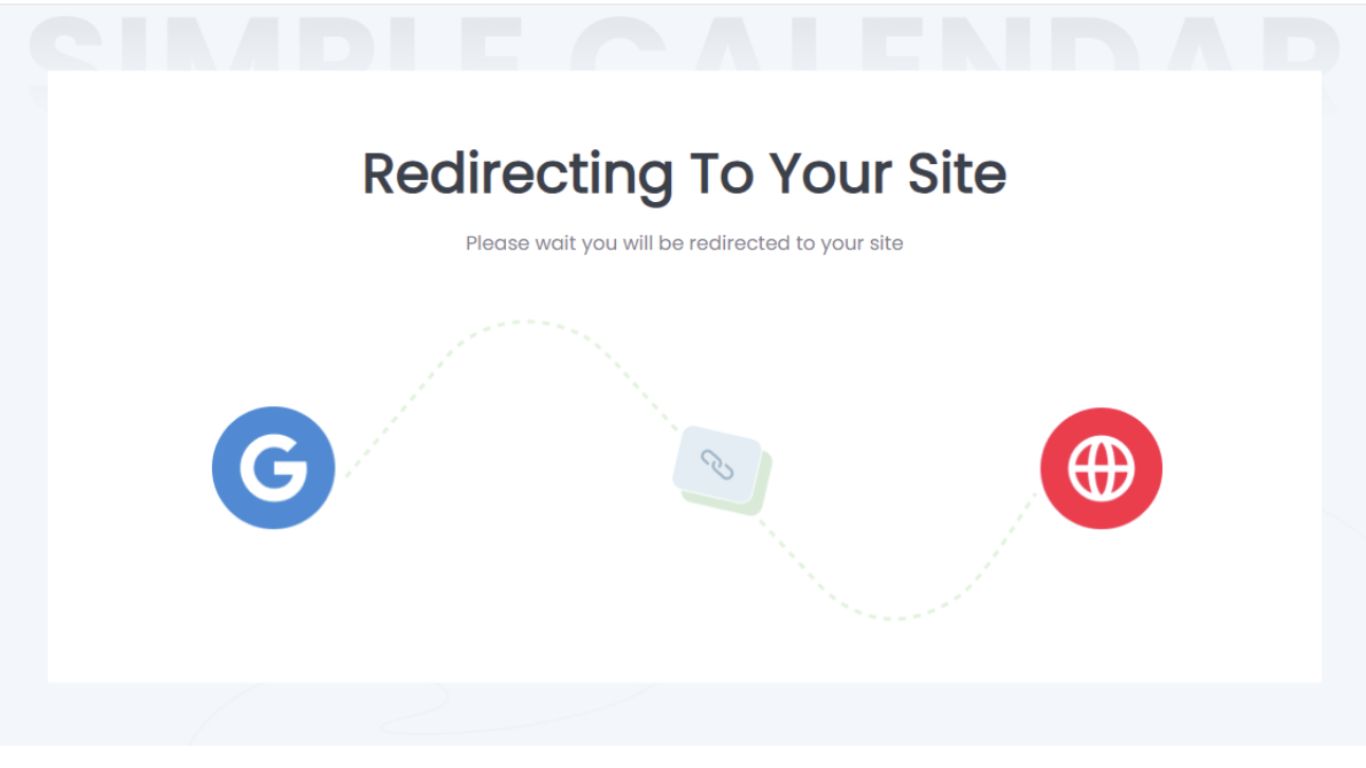
- The user comes to the auth site, i.e. http://auth.simplecalendar.io/, and then redirects to Google.
- Once the user logs in and approves the connection with Google, our OAuth Helper plugin takes over. It captures and saves the authorization code from the Simple Calendar server and redirects the user to their website.
This add-on helps reduce setup time dramatically from hours to minutes. PLUS, you’re just left with a few clicks without dealing with complex API configurations.
Importance of seamless integration
Challenges you might face!!..
Many users find learning the complex world of calendar integration and authentication daunting. The setup can involve navigating through a maze of developer documentation, API keys, and various technical settings.
Authentication, especially when dealing with secure services like Google Calendar, often requires a series of permissions and security tokens.
Even after everything is set up, sometimes events won’t show up on your website’s calendar. They either don’t show up, show up at the wrong time, or duplicate themselves.
Then, you might face security concerns or issues in keeping up with regular updates. While these challenges can seem daunting, the good news is that solutions like OAuth helpers and integration plugins are designed to make this process smoother.
How Simple Calendar solves these challenges
Simple Calendar offers a user-friendly setup that guides you through connecting your Google Calendar to your WordPress site with just a few clicks. Now, it features an effortless authentication helper process with OAuth Helper.
We are flexible and thus built our Simple Calendar plugin to adapt to changes. Keeping in mind the common pain points of calendar integration and the lengthy authentication process, we have introduced OAuth Helper.
You can use our newly released beta version of the OAuth Helper addon that ensures a secure connection between your Google Calendar and your website.
Why OAuth Helper?
Because your time matters!
-
Time efficiency
OAuth Helper cuts down the manual process of Google Calendar integration, enabling faster and more efficient setup. You won’t have to navigate through multiple Google API settings and authentication steps.
-
Enhanced security
OAuth Helper securely handles all tokens, ensuring they are stored safely in the WordPress database and refreshed automatically, thereby maintaining a high level of security.
-
Continuous synchronization
OAuth Helper ensures that the calendar data is continuously synchronized between your Google Calendar and WordPress site by managing the authentication tokens effectively. This is crucial for keeping event information up-to-date automatically.
-
Error handling
OAuth Helper provides inbuilt error-handling mechanisms and clear diagnostic logging. This feature helps non-technical users to easily identify and resolve issues that arise during the integration process without needing to understand the underlying technical complexities.
-
Refresh tokens
OAuth Helper utilizes refresh tokens. It means users don’t need to worry about token expiration and can ensure their site’s calendar integration remains operational without interruptions.
-
Broad compatibility
OAuth Helper is designed to work seamlessly with the Simple Calendar plugin and adheres to Google’s API standards, ensuring compatibility across different versions of WordPress and various server environments.
-
Enhanced user experience
OAuth Helper allows users to focus on what’s important: managing their events and content as it abstracts the complexities of OAuth and API interactions.
-
Cost-effective
For businesses and individuals who rely on efficient calendar integrations but lack the technical resources to implement complex authentication systems, OAuth Helper offers a cost-effective solution.
How does OAuth authentication benefit various industries?
This add-on opens up numerous possibilities for various businesses. Here are some specific sectors that stand to benefit significantly:
Small businesses
From local bakeries running baking classes to fitness studios, OAuth Helper will be a great help for scheduling. This integration can enhance customer experience by providing real-time updates and changes directly to the users’ calendars.
Event planners & venues
Professional event planners and venues that host events such as weddings, conferences, and corporate functions can use OAuth Helper to manage their event schedules efficiently.
Educational institutions
Schools, colleges, and universities can use the OAuth Helper to streamline the scheduling and dissemination of academic calendars, exam dates, and other school events. This makes it easier for students, parents, and staff to stay informed about upcoming activities and deadlines.
Religious organizations
Churches, mosques, synagogues, and other religious bodies often manage a complex schedule of services, classes, and community events. Our add-on simplifies the management of these events, making it easier for congregations to access updated event information.
Non-profit organizations
It can help non-profit organizations reduce the administrative overhead associated with event management, allowing them to focus more on their core mission rather than on logistical complexities.
Healthcare providers
Clinics and healthcare professionals who need to manage patient and staff schedules can utilize OAuth Helper to maintain an accurate and private calendar.
For Personal use
Individuals who manage busy personal schedules, including family events and social gatherings can also benefit from the OAuth Helper. It provides a straightforward and reliable method to keep personal calendars synchronized and accessible from any device.
Exclusive OAuth Helper (Beta Release) Offer
As a token of our appreciation for your support during this beta phase, we’re offering an exclusive 50% off on the current price. Simply apply the code OHBETA50 at checkout.

Please provide us with your valuable feedback either in the comments or Contact Us here. It allows us to identify and fix any issues, ensuring the plugin is as user-friendly and efficient as possible.
Get started with the Simple Calendar OAuth Helper addon
Although Simple Calendar allows seamless integration of Google Calendar into the WordPress website, it still involves certain time-consuming steps. And, this is where OAuth Helper comes into play!
The minimal steps involved make it a must-have add-on for Simple Calendar. Given below are the steps required to get started with OAuth Helper.
Step 1: Activate the plugin
You can purchase this add-on Simple Calendar – OAuth Helper (Beta) here.
Step 2: Authenticate

Then, you need to click ‘Allow’ to give certain permissions, and VOILA, IT’S DONE! Yes, this is how quick the process becomes with our OAuth Helper.
You are only required to see the following screens while we’re processing your request… That’s why we call it a matter of minutes, not hours!

BONUS: Our plugin uses refresh tokens. They automatically acquire new access tokens in the background so that you won’t have to re-authenticate every time your access token expires.
Do you want to know how lengthy it is without OAuth Helper?
You are required to set up a Google OAuth client with the following steps:
Step 1: Go to Google Developers Console.
Step 2: Create a New Project.
Create a New Project, name it, and agree to the terms and conditions.

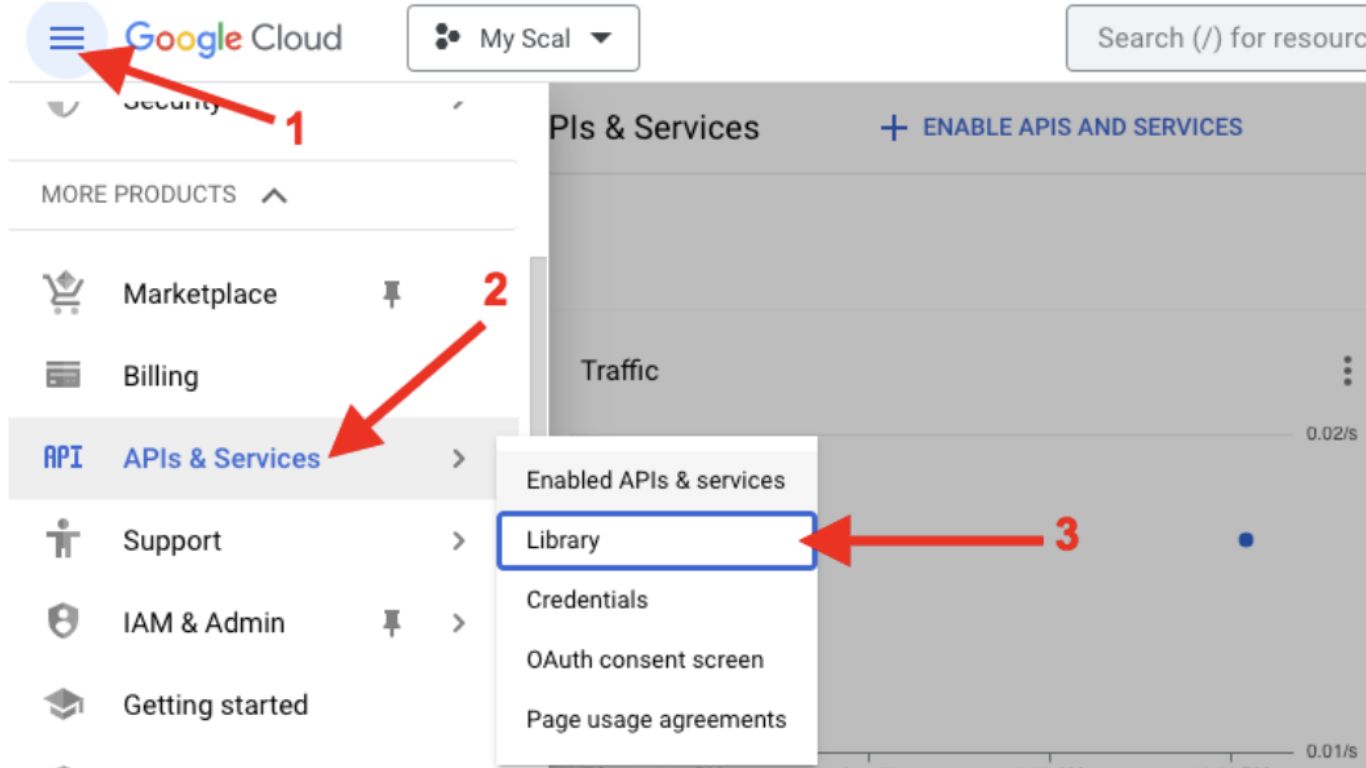
Step 3: Enable APIs and Services
Select Enable APIs and Services. Alternatively, you can select Library from the left-side menu.
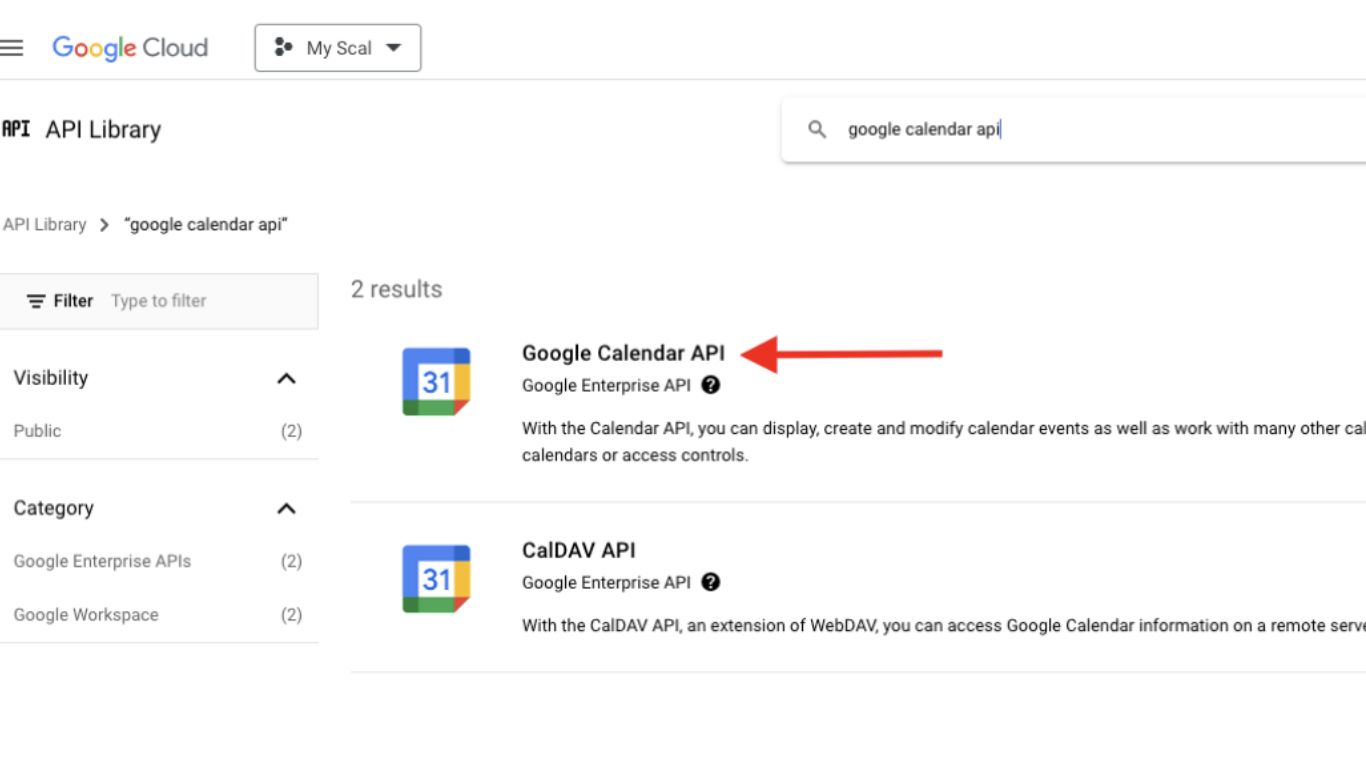
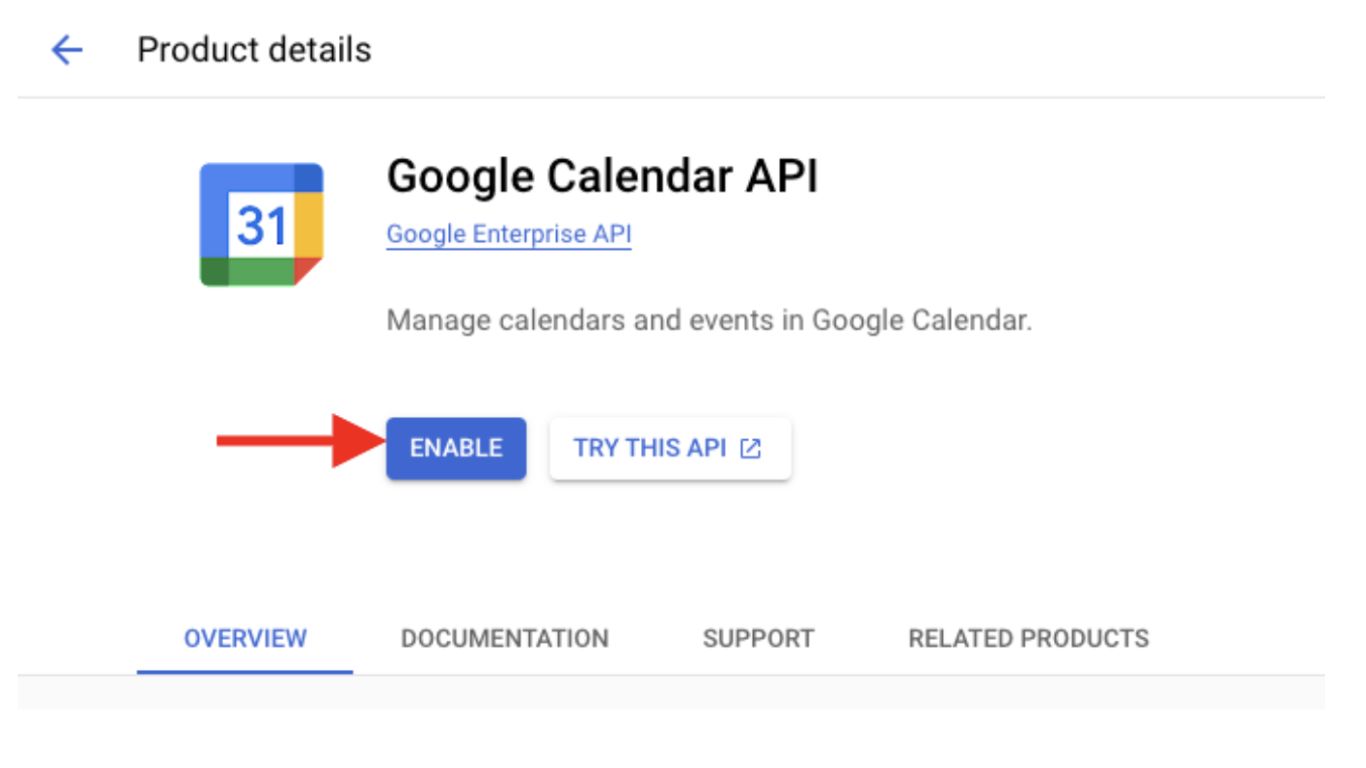
Step 4: Enable Google Calendar API
Search for and select Google Calendar API under the API Library. Then, select Enable.
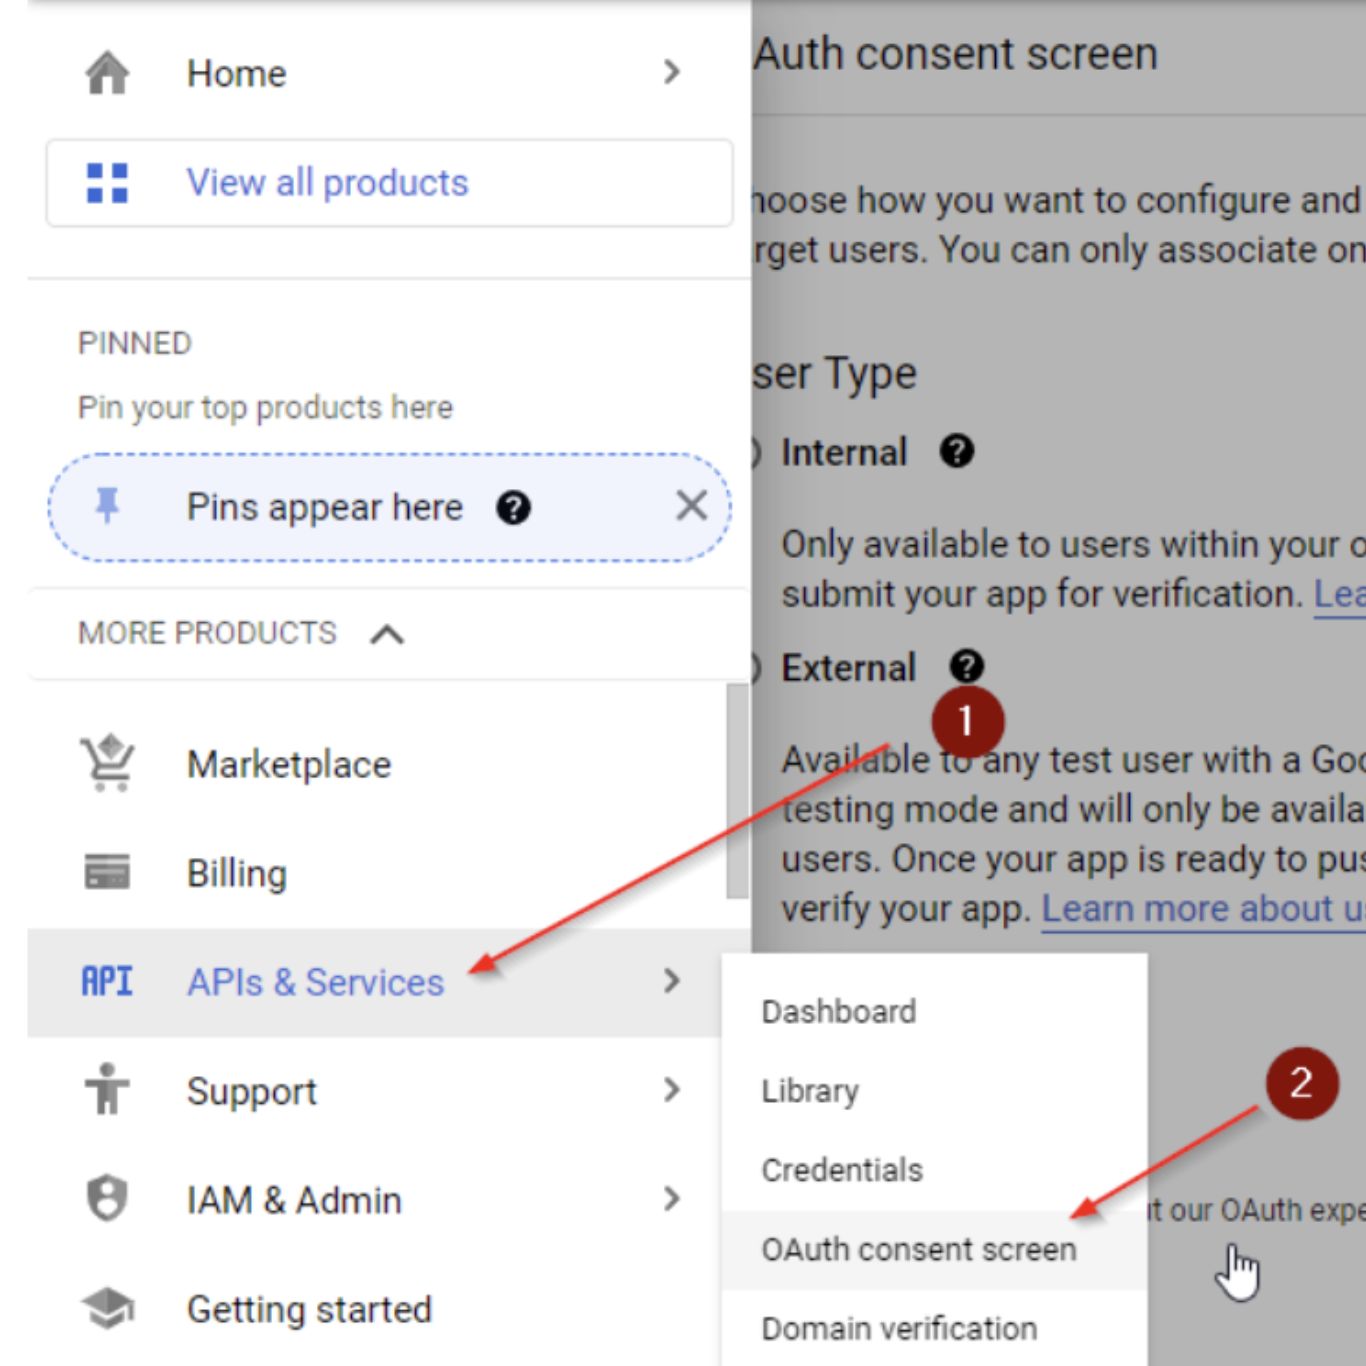
Step 5: Configure the OAuth consent screen
Go to the Menu icon on the top-left side and configure the OAuth consent screen. Click APIs & Services > OAuth Consent Screen.
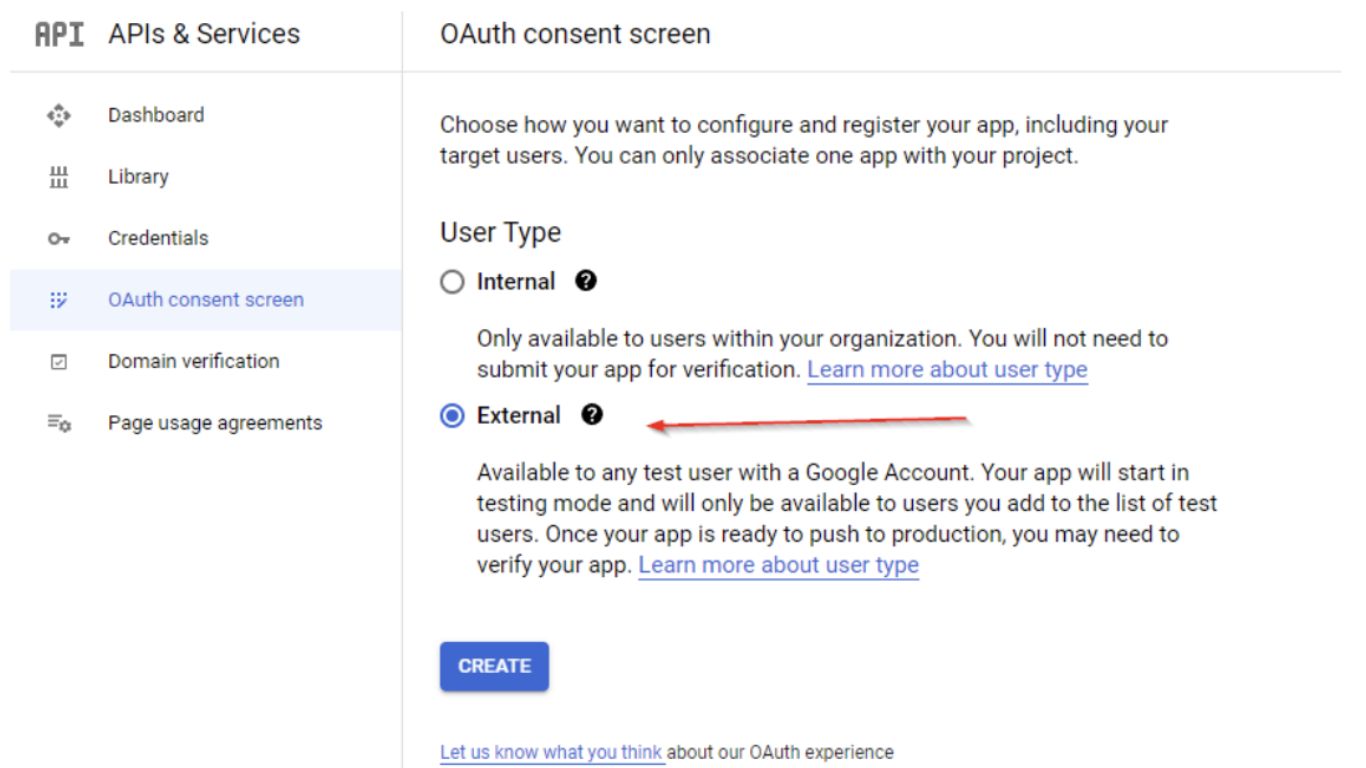
Step 6: Select the user type
Select External as the user type. Then, click Create.
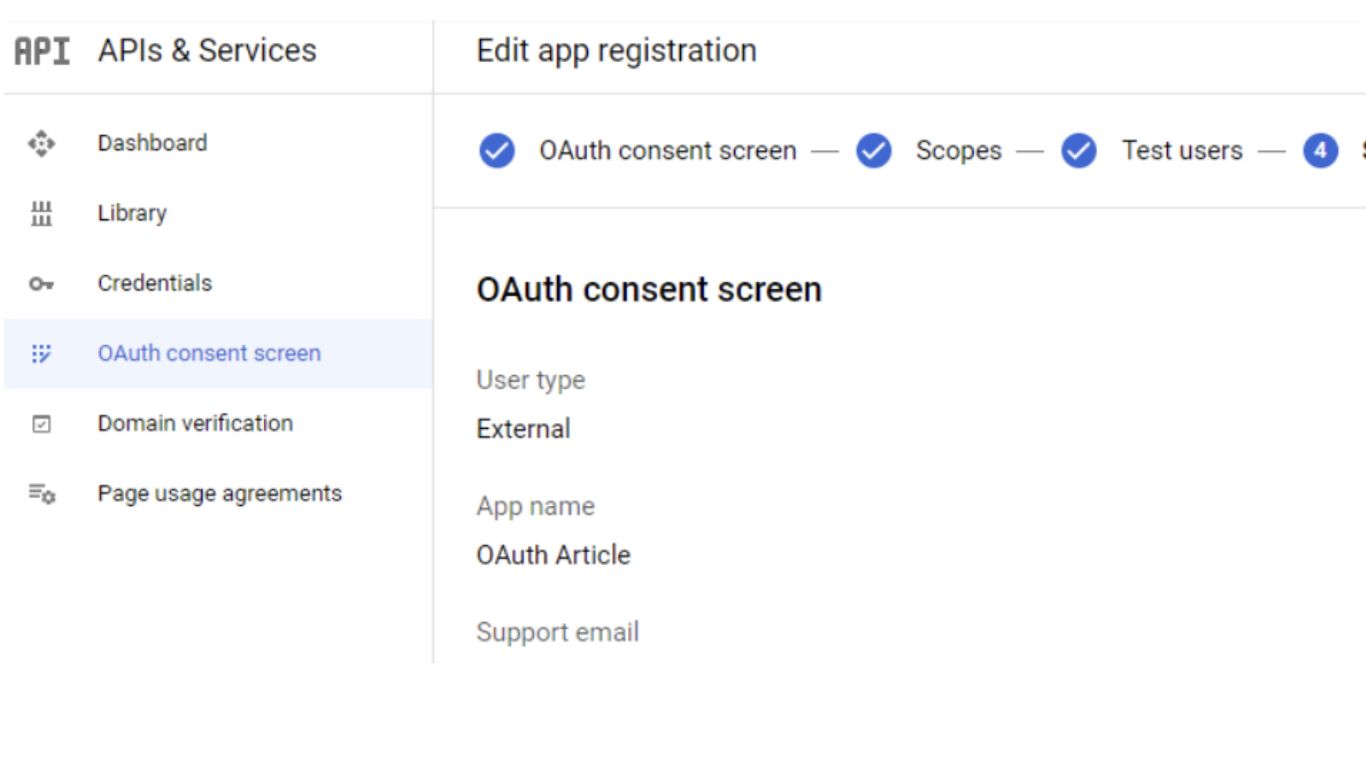
Step 7: Edit app registration
Add app name (optional), user support email, and developer support email. Next, click Save and Continue.
Save your changes and keep going to the Scopes, Test Users, and Summary screens. Also, your app should be published, not in ‘testing mode’.
It presents you with the following Summary page screen.
Step 8: Create credentials
Go to the left-side menu. Select Credentials> +CREATE CREDENTIALS. Now, skip the setup wizard by choosing the Client ID. 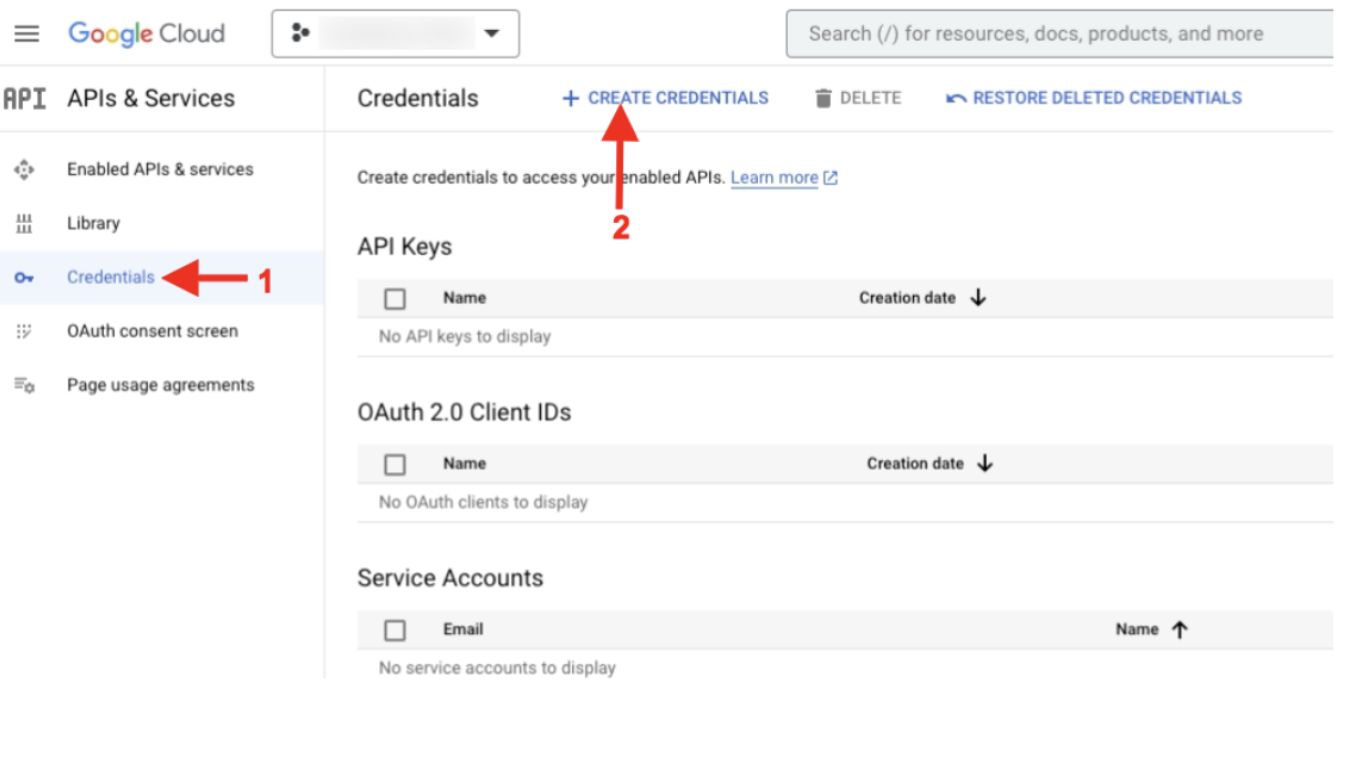
Step 9: Set up an API key & OAuth client ID
Select the options API key & OAuth client ID as shown in the following screenshots.


Step 11: Name the application & enter URL details
Name your application (such as ‘Simple Calendar Client ID’) and enter authorized redirect URI details.
You will find this URL under the Redirect URL field. This field is located under the Calendar> Settings on your WordPress dashboard.
Select the Create button once you are done with the above steps.
NOTE: It may take a few minutes to a few hours for the settings to take effect.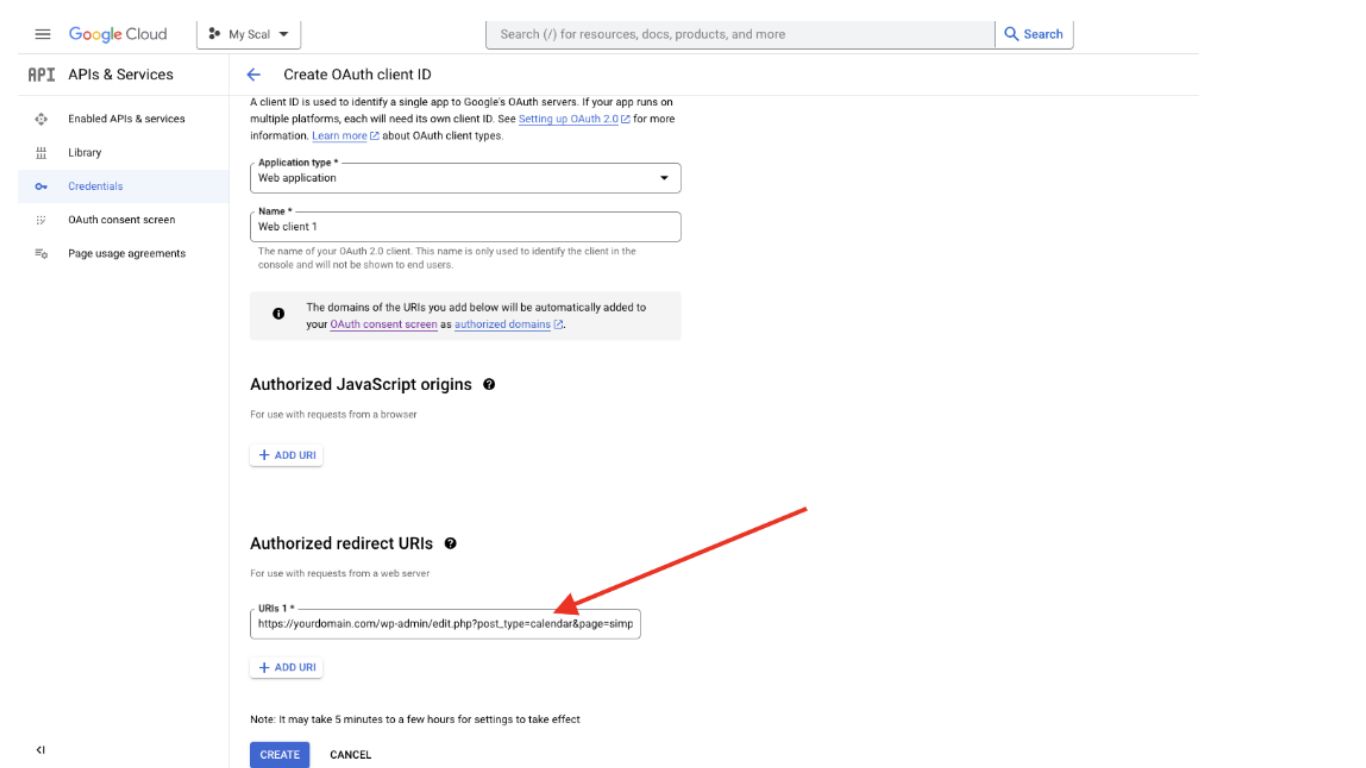
Step 12: Get your Client ID and Client Secret
Now, you will get your Client ID and Client Secret. You can save your credentials for future reference.
Go to your site’s WordPress admin page in another tab while you keep your Google Developers Console open.

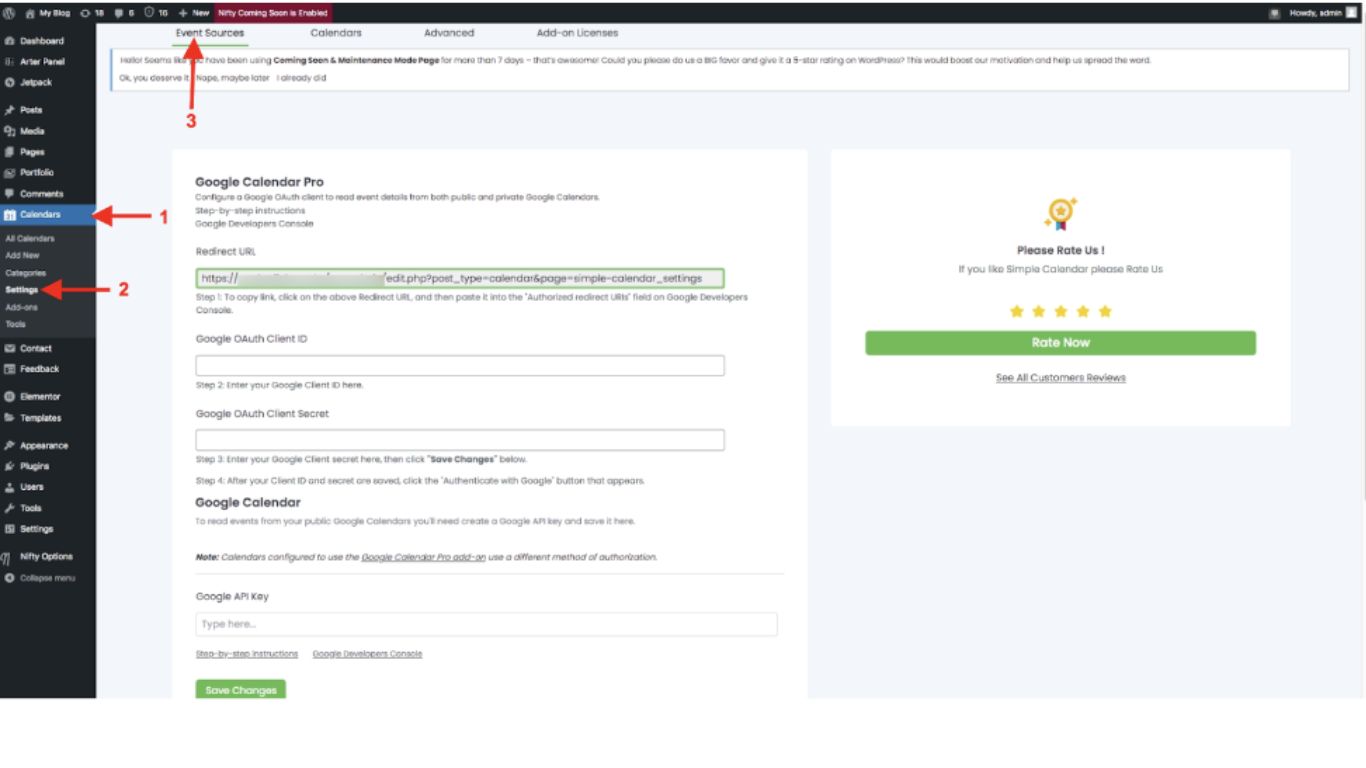
Step 13: Edit Event Sources
Go to Calendar> Settings> Event Sources.
You will need to copy and paste the API Key, Client ID, and Client secret values from the Google Developers Console into these fields one at a time. Then, hit the Save button.
Step 14: Authenticate with Google
Now, click the Authenticate with Google button.

NOTE: You can check this article to verify your app.
You can now proceed with the authentication process and click the Continue tab as shown below.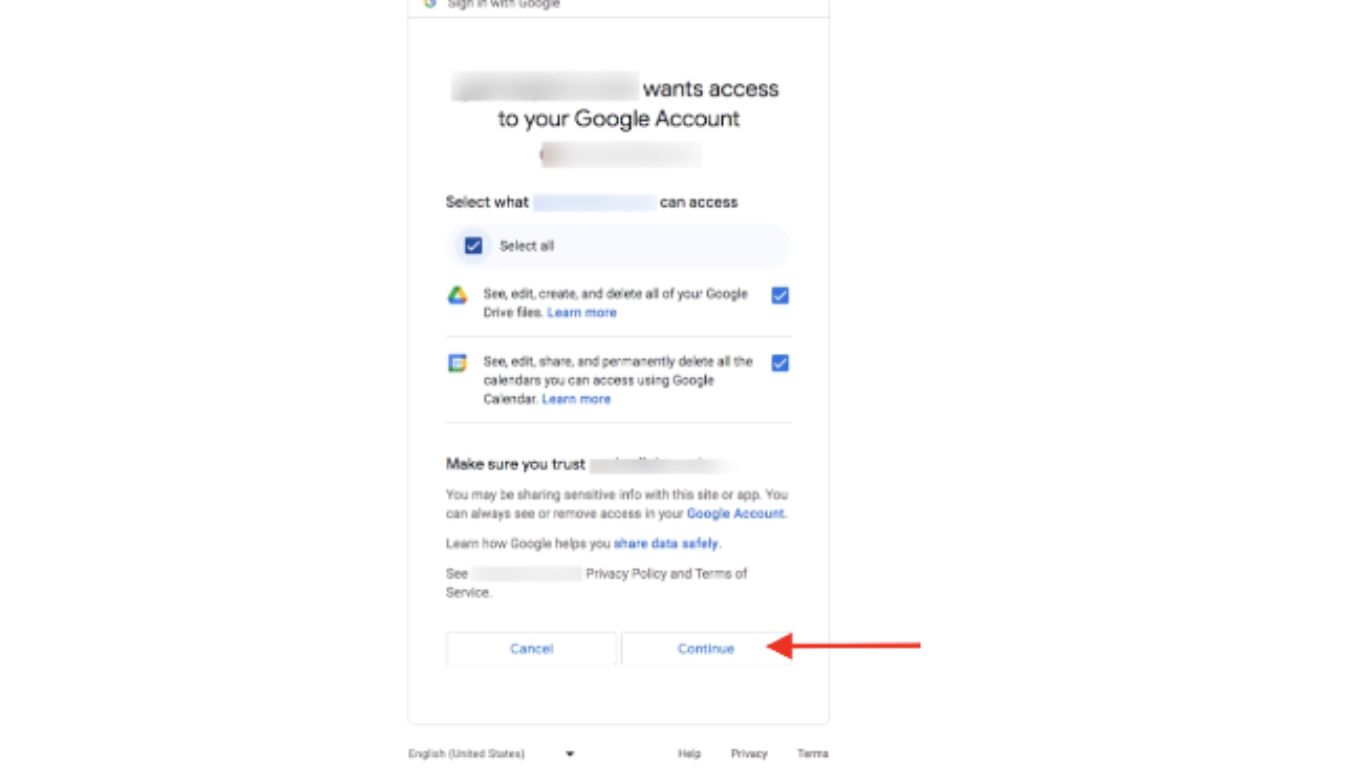
NOTE: Please log in to Google if you are not already logged in. It authorizes the Simple Calendar to access the calendar of the Google user who is already logged in.
If you share your WordPress installation with other users, they won’t be able to control your Google account, but if they have access rights to Simple Calendar, they might be able to read or control your calendars.
Yes, 14 STEPS!!! And, don’t forget the time it might take for the settings or changes saved to take effect…
That’s why OAuth Helper comes to your RESCUE!
Explore OAuth Helper today and experience the change (steps reduced from 14 to almost 3), Quite Amazing!