
TL;DR
- You can share your Google Calendar access in three main scenarios:
- Share access with specific persons only.
- Make your Google Calendar public and share access with everyone.
- Share access with everyone in your organization.
- Please note that sharing your Google Calendar access could allow anyone to create or edit events, respond to invitations, share your calendar with others, and delete your calendar. So, learn more about the permission settings here.
- You can control what you want to share by permissions settings.
- You can also control the visibility of each event, choosing whether to make it public or private.
- These steps will help you access someone else’s Google Calendar.
- Go to your Google Calendar and click Other calendars in the left sidebar.
- Click the + icon and select Subscribe to calendar.
- Enter the calendar email address or select one from the list.
- You can use plugins like Simple Calendar to share Google Calendar events on your WordPress site in real-time sync without making the calendar public or widely shared while ensuring secure access.
In this fast-paced digital era, staying organized and keeping track of our commitments has become increasingly vital. Luckily, Google Calendar has emerged as a game-changing tool, seamlessly integrating into our lives and revolutionizing the way we manage our schedules.
But did you know that beyond personal use, Google Calendar possesses a remarkable capability to enhance collaboration and productivity in diverse scenarios?
We have created this comprehensive guide on quickly learning to share access to your Google Calendar in different situations. Not only will we delve into the remarkable impacts of sharing calendar access, but we will also unveil many scenarios where you can leverage this feature to the fullest.
What Are The Impacts Of Sharing Your Google Calendar Access With Someone?
It’s crucial to exercise caution when sharing your Google Calendar and carefully consider what level of access you grant to others. Granting full access permissions means that the recipient will have significant control over your calendar.
They can respond to invitations, create and edit events, share your calendar with others, receive email notifications about changes, and even delete your calendar.
Additionally, if your Google account is managed by your workplace or educational institution, there may be restrictions on sharing outside of the organization. So, be aware of any limitations set by your account’s admin.
Know How To Share Access To Your Google Calendar By Setting Different Access Permissions
1. Share Google Calendar Access With Specific Persons Only
Step 1: Open Google Calendar
You need to open Google Calendar on your computer as you can’t share access directly from the app.
Step 2: Go to My Calendars
Expand the My Calendars section by clicking the Down Arrow. Share access to google calendar.
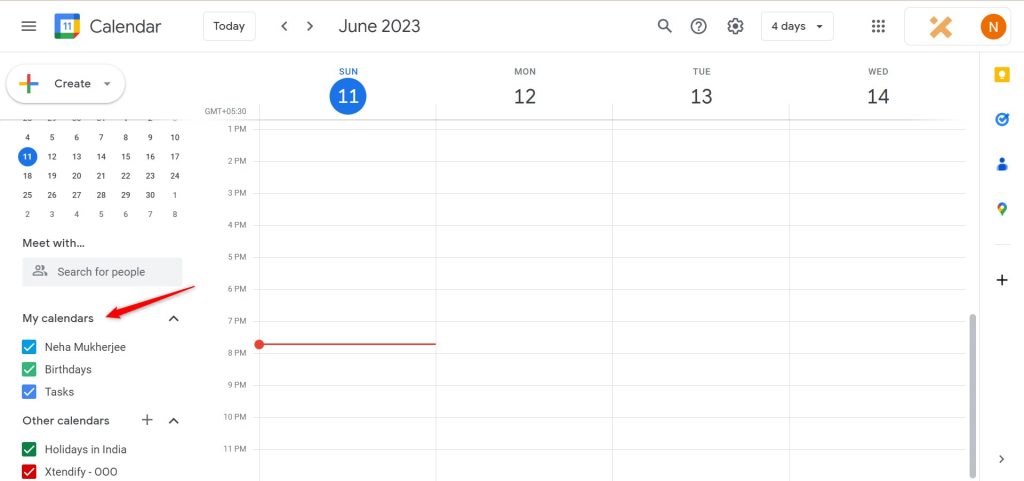
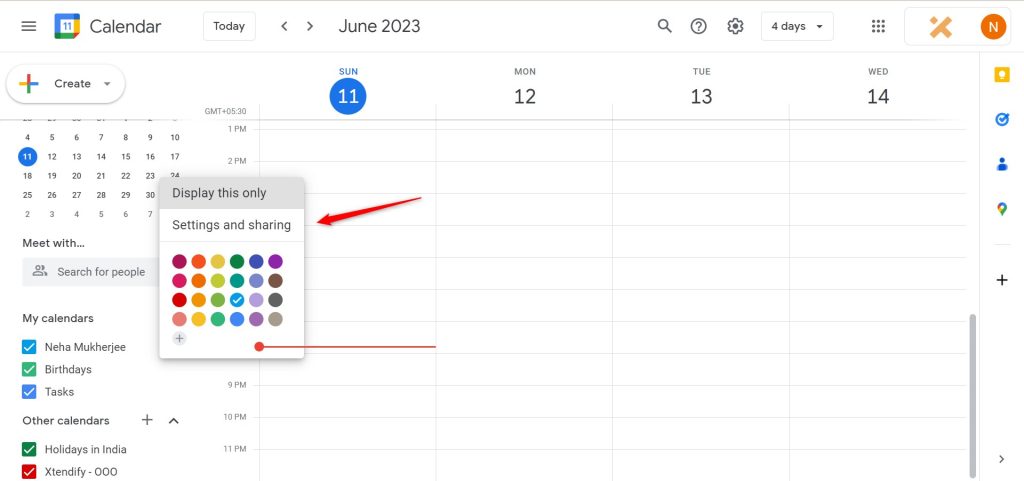
Step 3: Hover over the calendar you share access for. Let’s suppose you want to share access to your calendar events. So click the More tab, which is three dots, and go to Settings and Sharing as shown below. Google calendar settings and sharing.
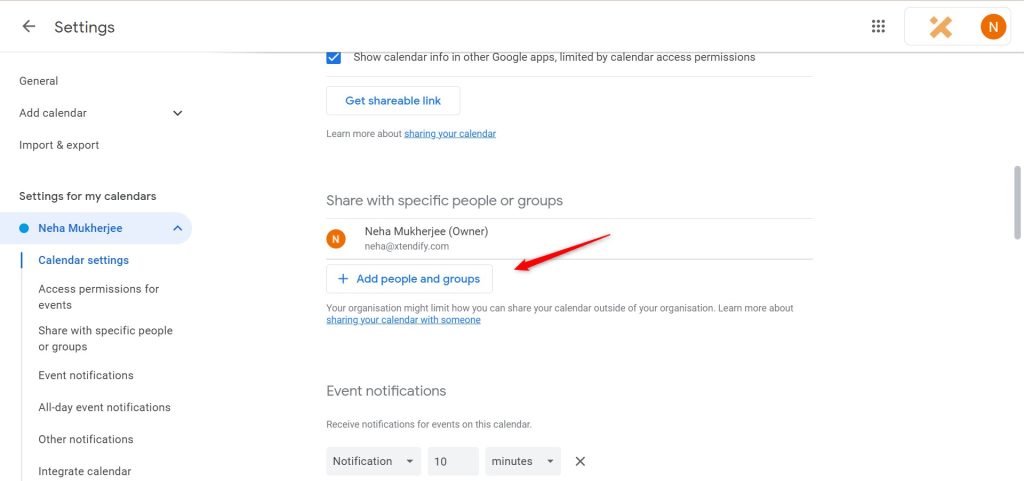
Step 4: Add specific people
Now, click the Add People and Groups tab under the Share with Specific People or Groups section.
Step 5: Share access to Google Calendar
You can now add the email address of specific people you want to share access to. And, this is how to share Google Calendar with multiple users as well. After you’re done adding the persons, click the drop-down menu under the Permission tab and select how to share Google Calendar to another person.
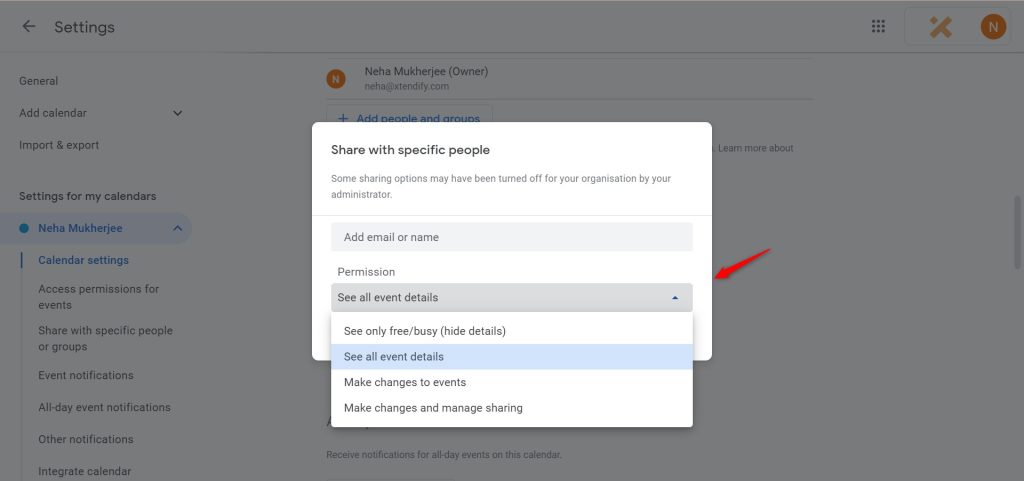
Then, click the Send tab, and you’re good to go.
2. Share Google Calendar Access With Everyone By Making It Public
You need to follow the same Step 1, Step 2, and Step 3 as described above. So, let’s begin with Step 4 directly!
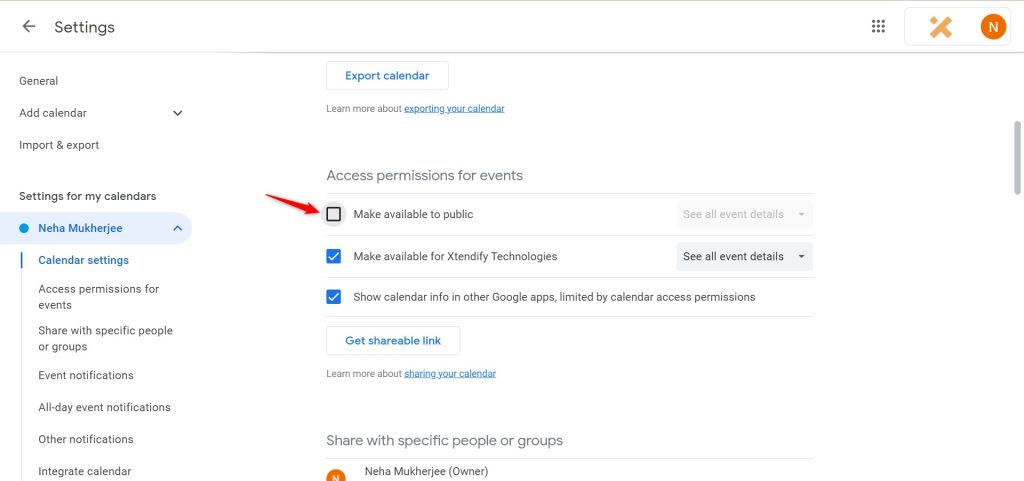
Step 4: Make Google Calendar access available to the public
It’s again a cautionary step as you share your full Google Calendar access with the public. So, think twice about your purpose and impact before doing it.
However, you can choose the level of access within the tab next to it. So, you can adjust it from See all event details to the level of access you want to share.
To do this, click the Make Available to Public tab under the Access Permissions for Events section.
3. Share Google Calendar Access With Everyone In Your Organization
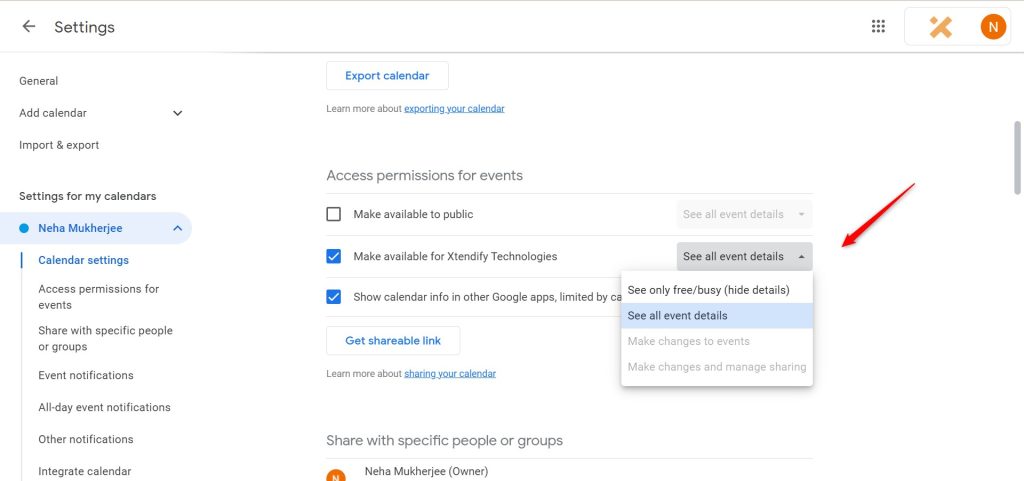
If you use Google Calendar through work, school, or other organizations, you will be able to see an option for the same under the Access Permissions for Events section.
It’s checked by default. However, you can set the permissions for how you want to share it by selecting between the See All event details and See Only free/busy (hide details) tab.
Know How To Allow Access To Google Calendar By Controlling Permissions Settings
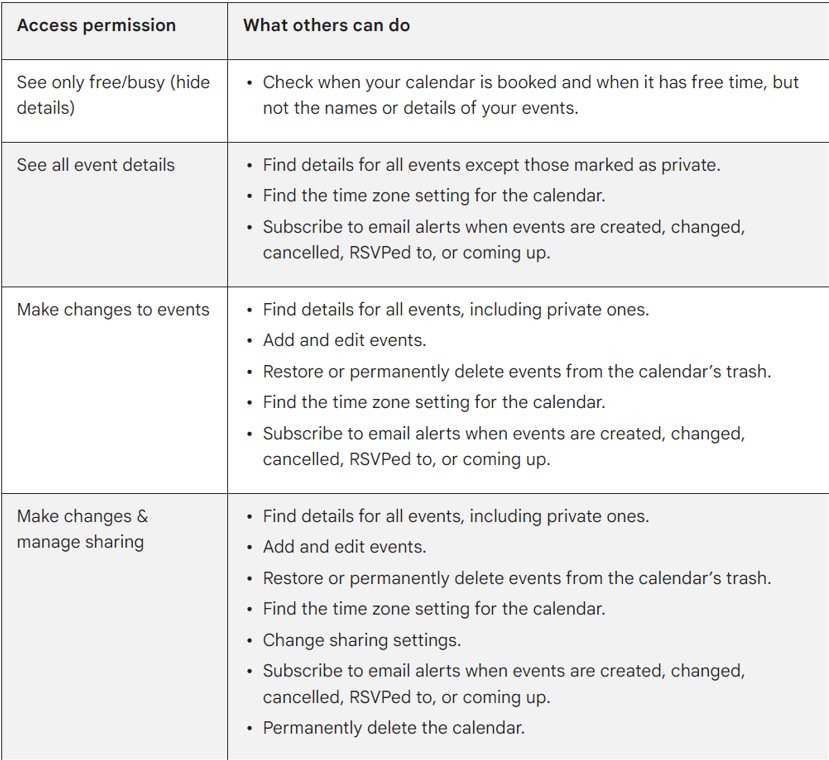
We’ve already talked about adjusting permissions settings before. But, what does it mean? Let’s understand the permissions settings in the screenshot below!
Learn How To Edit The Visibility For Each Event
When you choose to share your calendar, the privacy settings for your events will match those of your calendar. If desired, you have the option to customize the visibility of specific events for others.
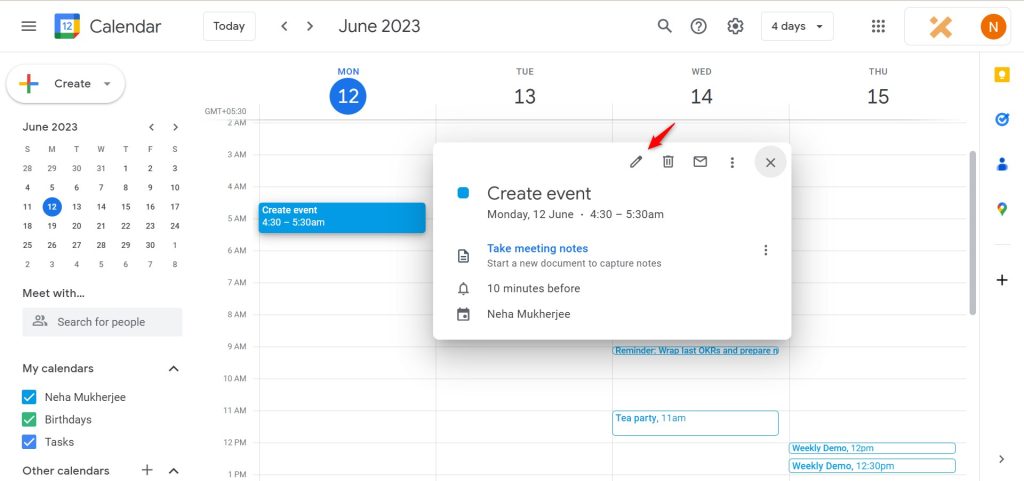
Step 1: Edit specific event
Open the event you want to change visibility settings for. Then, click the Edit Event tab as shown in the screenshot below.
Step 2: Change visibility settings of specific events
Click the Default Visibility tab and adjust the settings to Public or Private as you desire.
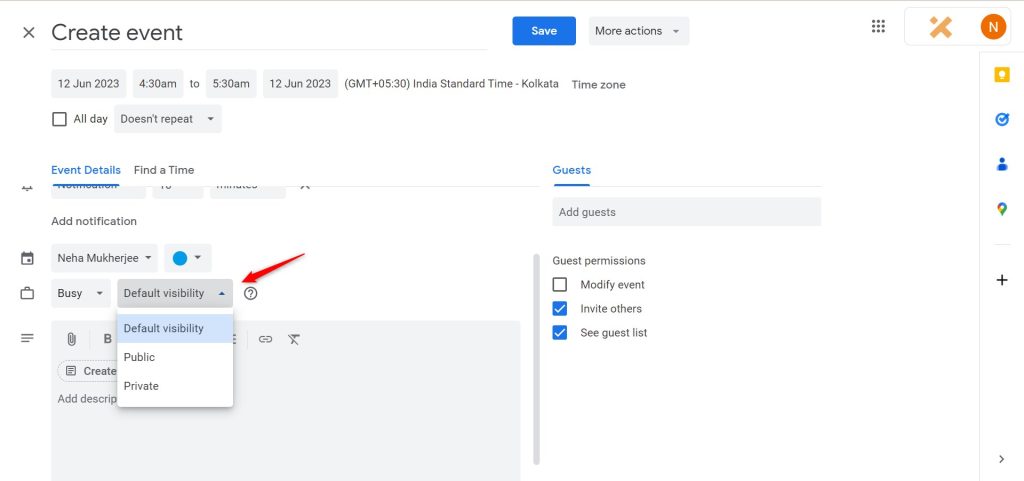
Hit the Save button after you’re done.
Know How To Access Someone’s Google Calendar
If someone has shared their calendar with you, you can view it. Additionally, if someone hasn’t shared their calendar with you yet, you can request access to it.
Step 1: Add other calendars
Click Add other calendars tab under the Other Calendars section as shown below.
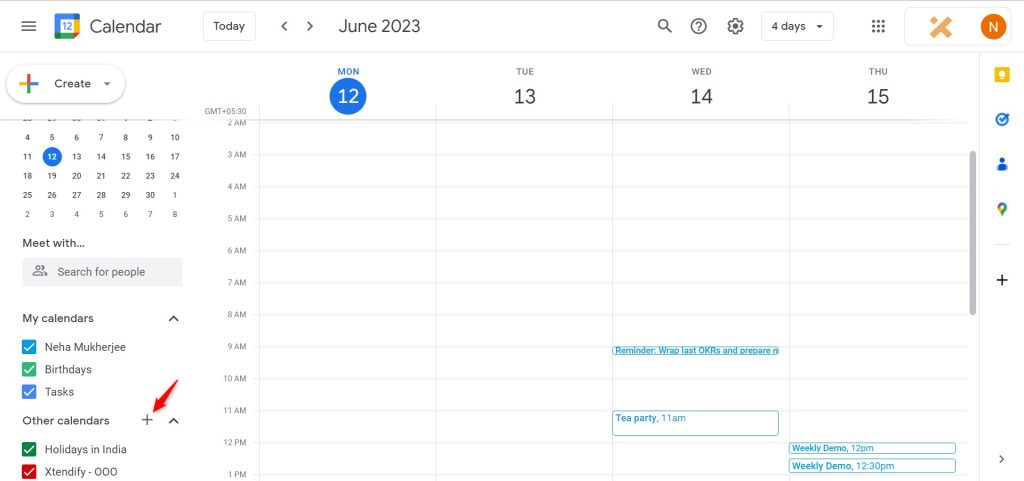
Step 2: Subscribe to other calendars
To request access to someone else’s calendar, click Subscribe to Calendar tab.
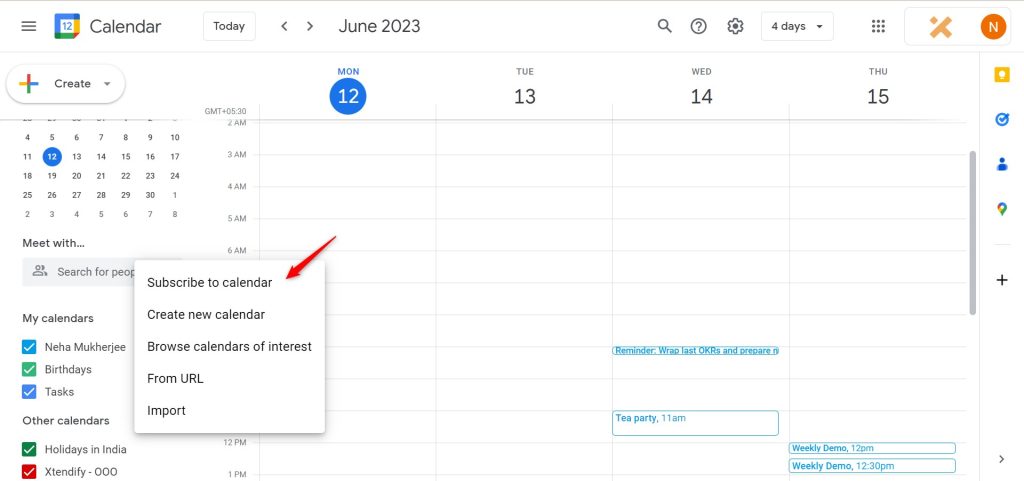
Add the email address of the calendar you want to get access to or select one from the list. Press the Enter button after you’re done adding or selecting the email address.
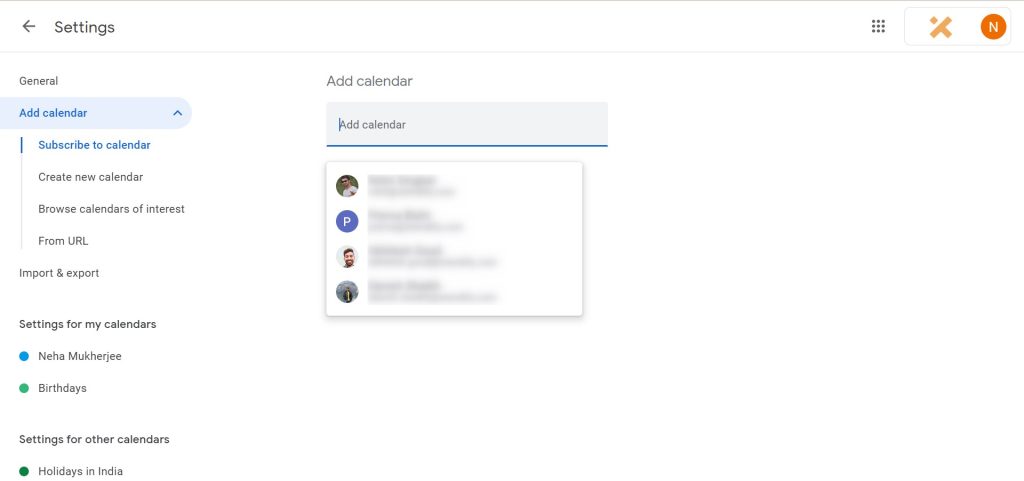
How To Share Google Calendar View Only?
It means you don’t want the viewers to edit your Google Calendar event. So, you need to choose to See only free/busy (hide details) or See all event details option while controlling the access permissions. Scroll above to understand more about the access permissions.
Also read: Benefits of integrating Google Calendar in WordPress website
Maximize Productivity with Simple Calendar & Premium Add-ons
If you’re running events or schedules through your website, plugins like Simple Calendar make it easy to add public or private Google Calendars to your WordPress site where the files are hosted. This is a super simple way to keep everyone in the know without putting in more work.
Google Calendar Pro Add-on, takes this experience to the next level with advanced functionality that lets users securely sync both public and private Google Calendar events. Moreover, it can even show color-coded events, participant info, organizer detail, etc., which makes calendar organization even further detail-oriented.
For more efficient appointment bookings, you can use the add-on called Book an Appointment. With it, users can build a dynamic appointment booking system embedded in their calendars.
If you’re looking for maximum value, our Price Saver Bundle Plans cover all premium add-ons, including Google Calendar Pro, FullCalendar, and Book An Appointment addon. Such plans are perfect for any individual or business looking for an affordable way to level up their calendar function while getting priority support and updates.
FAQs
How do I share a Google Calendar with specific people and set permissions?
To share your Google Calendar with specific people and set permissions:
- Open Google Calendar on your computer.
- Under ‘My calendars,’ find the calendar you want to share.
- Click the three dots next to it and select ‘Settings and sharing.’
- Scroll to ‘Share with specific people or groups’ and click ‘Add people.’
Enter their email address, then choose a permission or access level:
- See only free/busy (hide details): Shows only when you’re busy or free.
- See all event details: Allows viewing all event information.
- Make changes to events: Lets them add or edit events.
- Make changes and manage sharing: Full control, including sharing settings.
Click ‘Send‘ to share the calendar with chosen permissions.
Can I share only free/busy info without exposing event details?
To do this, when sharing your calendar, set the permission level for the person or group to ‘See only free/busy (hide details)’. It lets you share only your free/busy information without exposing event details in Google Calendar.
Can Google Workspace admins restrict calendar details tenant-wide?
Yes, Workspace admins can set organization-wide sharing policies that limit calendar sharing levels, such as only allowing free/busy info to be shared externally. These settings prevent users from exceeding the admin-defined sharing limits.
What should I do if someone I shared my Google Calendar with didn’t get the invite email?
Check that you entered the correct email. Ask them to check spam or trash folders. You can remove and re-add them to resend. Also, remind them to search their inbox for the sender’s email to locate the invite.
As a WordPress user, is there a way to display Google Calendar events directly on my site for viewers?
Yes, our Simple Calendar plugin for WordPress lets you embed and display Google Calendar events, including grouped calendars, directly on your site, keeping event information current and accessible to visitors.
How can I share my Google Calendar publicly but keep some events private?
Make your calendar public with default visibility for most events, but mark sensitive events as ‘Private.’ Private events will show only as ‘busy’ or won’t display details to the public while the rest remain visible.
Also Read: We’ll soon make Simple Calendar compatible with Snazzy Maps