
TL;DR
- Create the key: In Google Cloud Console, create a project, enable the Google Calendar API, then go to Credentials and create an API key.
- Make your calendar public: An API key can only read public calendars. In Google Calendar, open your calendar’s settings and turn on “Make available to public.”
- Copy your Calendar ID: It’s under “Integrate calendar” on the same settings page.
- Add both to Simple Calendar: Paste the API key under Calendars → Connect, and the Calendar ID in your calendar’s settings.
- Events still not showing? It’s almost always a calendar that isn’t public, a wrong Calendar ID, or a disabled API. See the troubleshooting section below.
- Do you want to connect to a private Google Calendar? Skip the API key and use a secure OAuth connection with Google Calendar Pro instead.
You’ll be asked to create a Google Calendar API key whenever you want to display Google Calendar on your site using a WordPress calendar plugin. It’s the credential that allows your site to request events from Google Calendar.
The good news is that creating this credential is free and takes about 14 to 15 minutes. However, it can be a bit of a roller coaster, especially for non-technical users. The Google Cloud Console UI isn’t designed with WordPress site owners in mind, so there’s a high chance of missing a step along the way. And that’s when you might end up with a calendar that doesn’t display any events.
This guide walks you through every step of the process. It also covers the most common reasons why events don’t show up on your calendar and how to fix them.
What is the purpose of creating a Google Calendar API key?
An API key allows access to Google’s services. It identifies your website when it asks Google for calendar data. It doesn’t log in to your Google account, so it can only read calendars that are already public. Yet, it’s not the only way to connect a calendar to WordPress.
| Connection method | Works with | What you need | Works with |
| Google API key | Public Google Calendars | A free key from Google Cloud Console | Free Simple Calendar plugin |
| OAuth connection | Private & public Google Calendars | Google Calendar Pro addon | Google Calendar Pro add-on for the Simple Calendar plugin |
| ICS file or live feed URL | Outlook, Apple Calendar, & other apps | An .ics file or feed URL | Free Simple Calendar plugin (ICS file import); Google Calendar Pro addon (live ICS feed URL) |
Please keep reading if your calendar is public and lives in Google. If it’s not, please scroll directly to the private calendars section or read our guide to displaying calendars with ICS feeds.
How to create a Google Calendar API key for WordPress
Go through the following guided steps with related screenshots to create a Google Calendar API key and use it in WordPress to display your public calendars.
Step 1: Create a project in Google Cloud Console
1. Go to the Google Cloud Console and sign in.
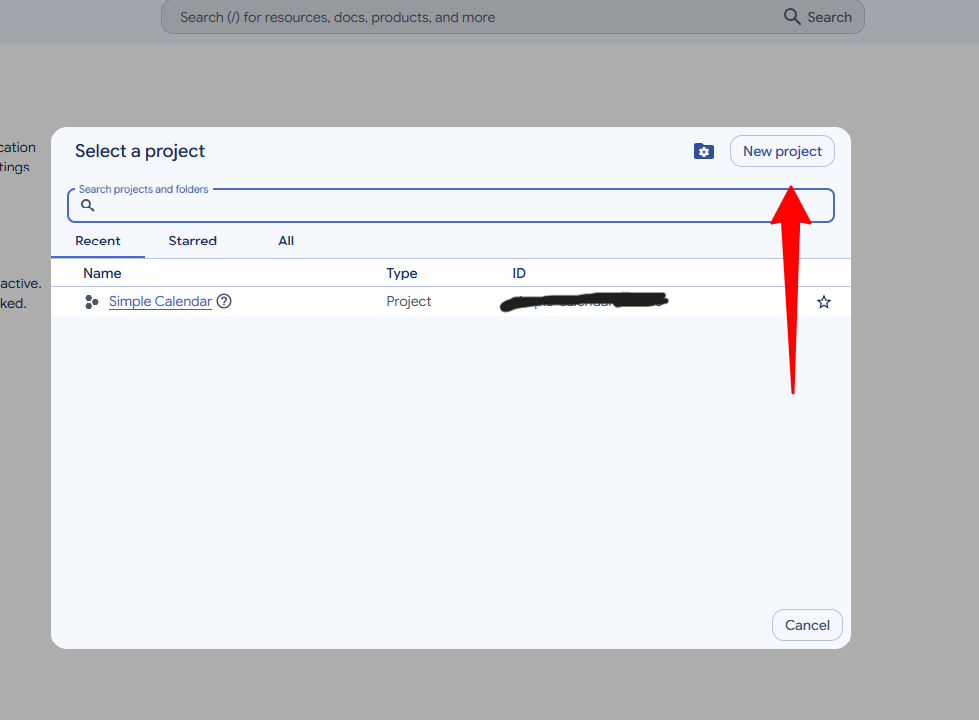
2. Click the project dropdown at the top of the page, then click New Project.
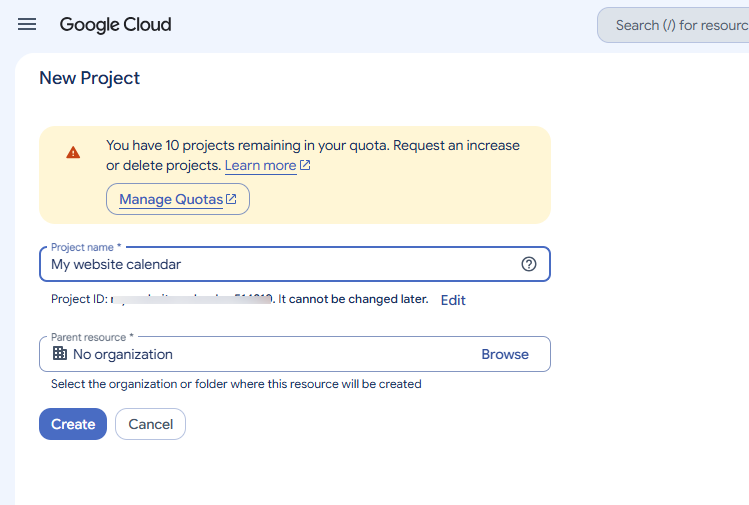
3. Give your project a name you’ll recognize later, such as “My Website Calendar,” and click Create.
Step 2: Enable the Google Calendar API
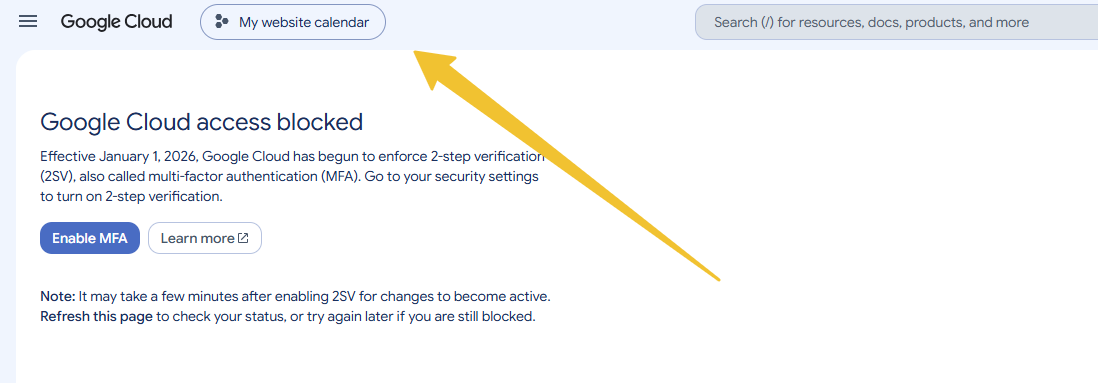
1. Make sure your new project is selected in the project dropdown.
2. Go to APIs & Services and click Enabled APIs and Services.
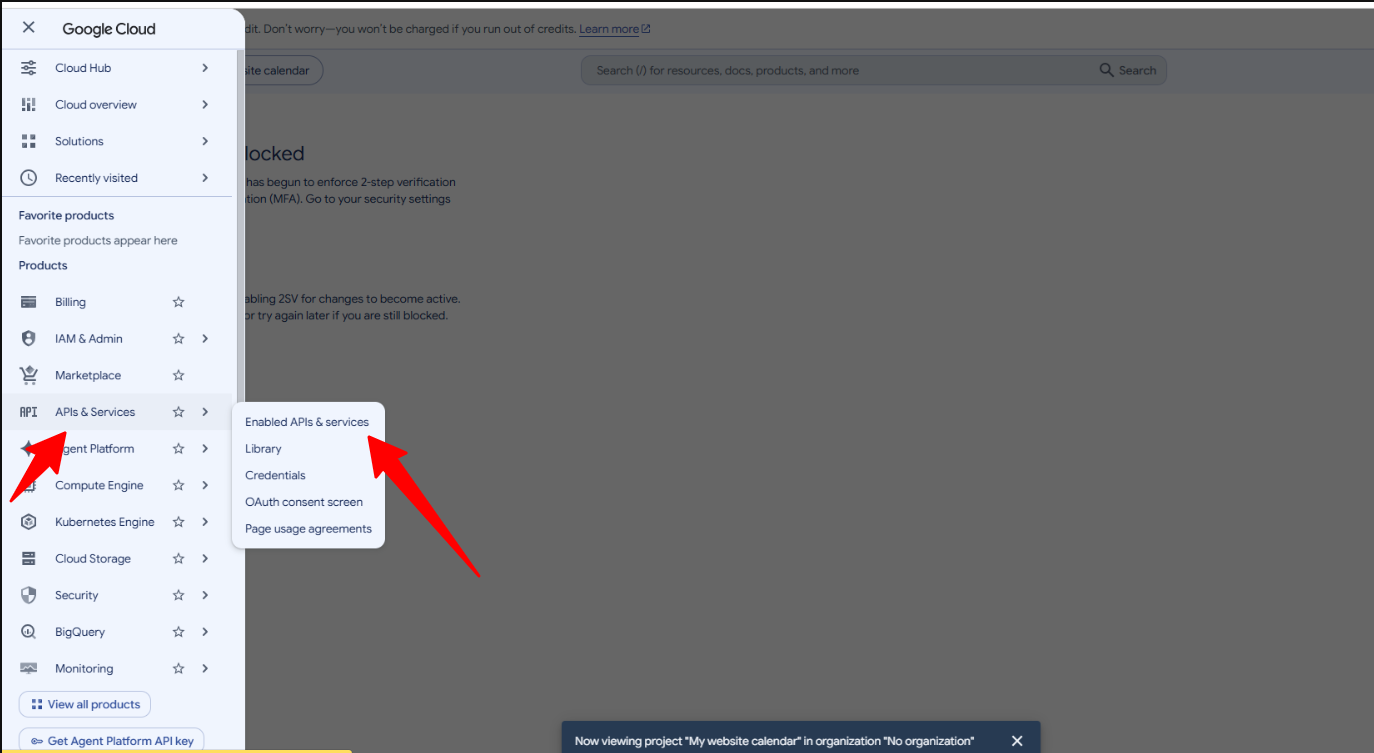
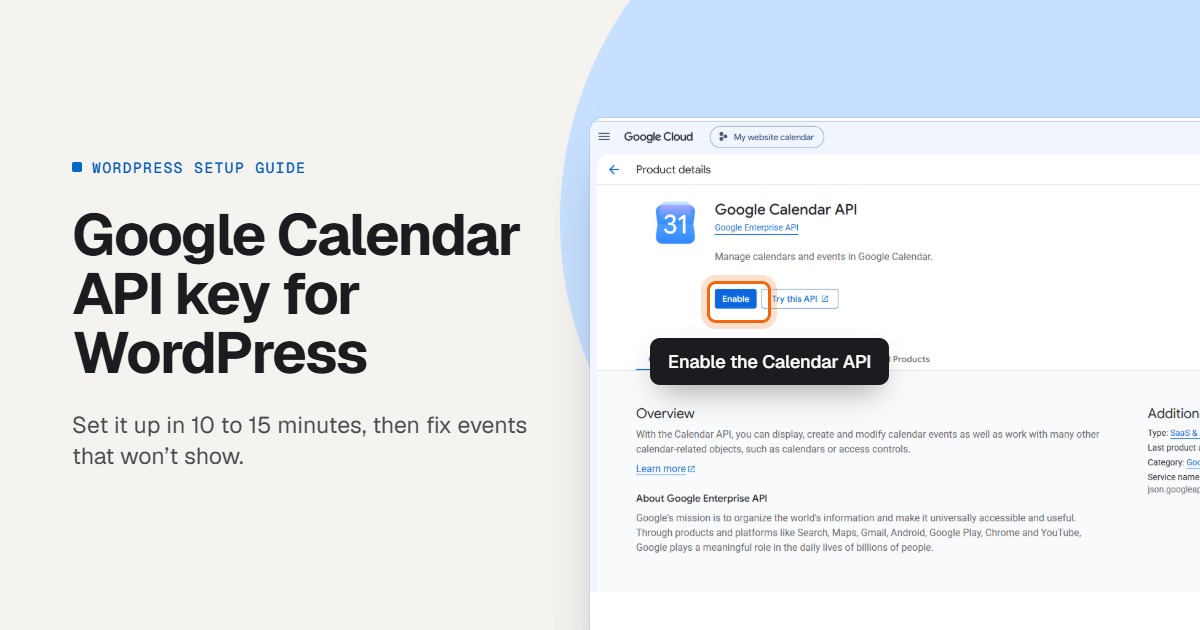
3. Search for Google Calendar API, open it, and click Enable.
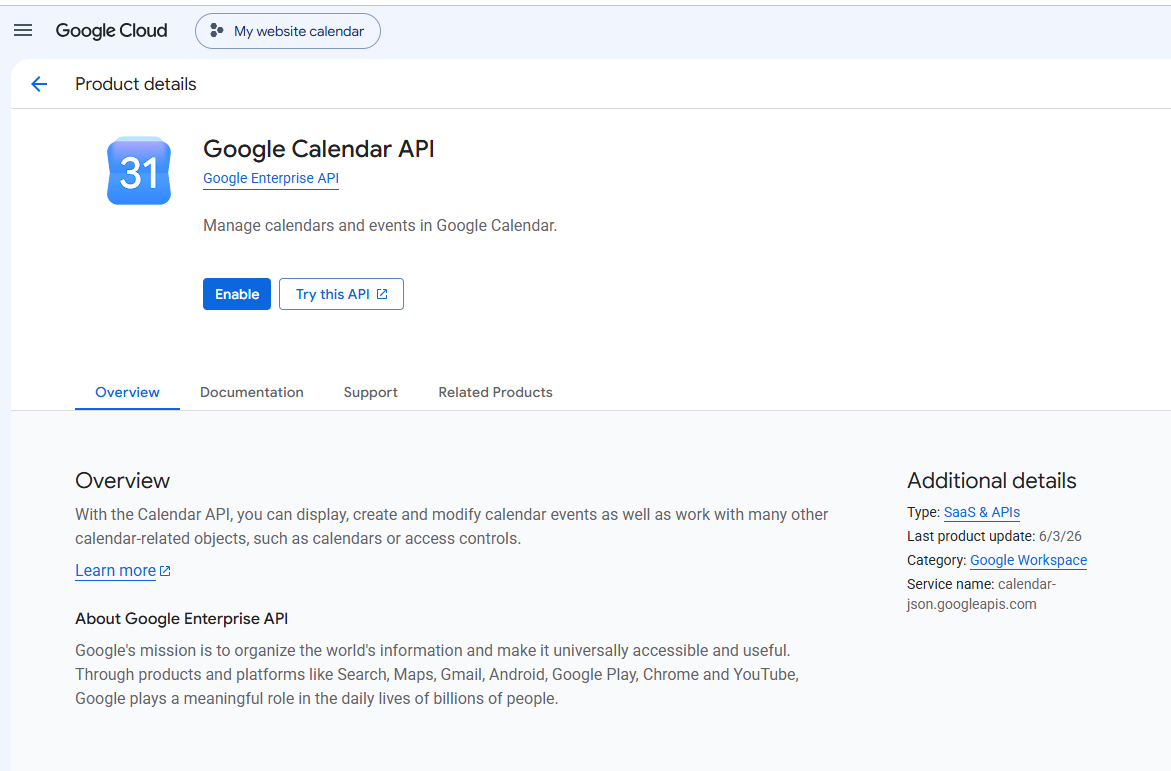
Note: This is the step people miss most often. A key from a project without the Calendar API enabled won’t return any events.
Step 3: Create the API key
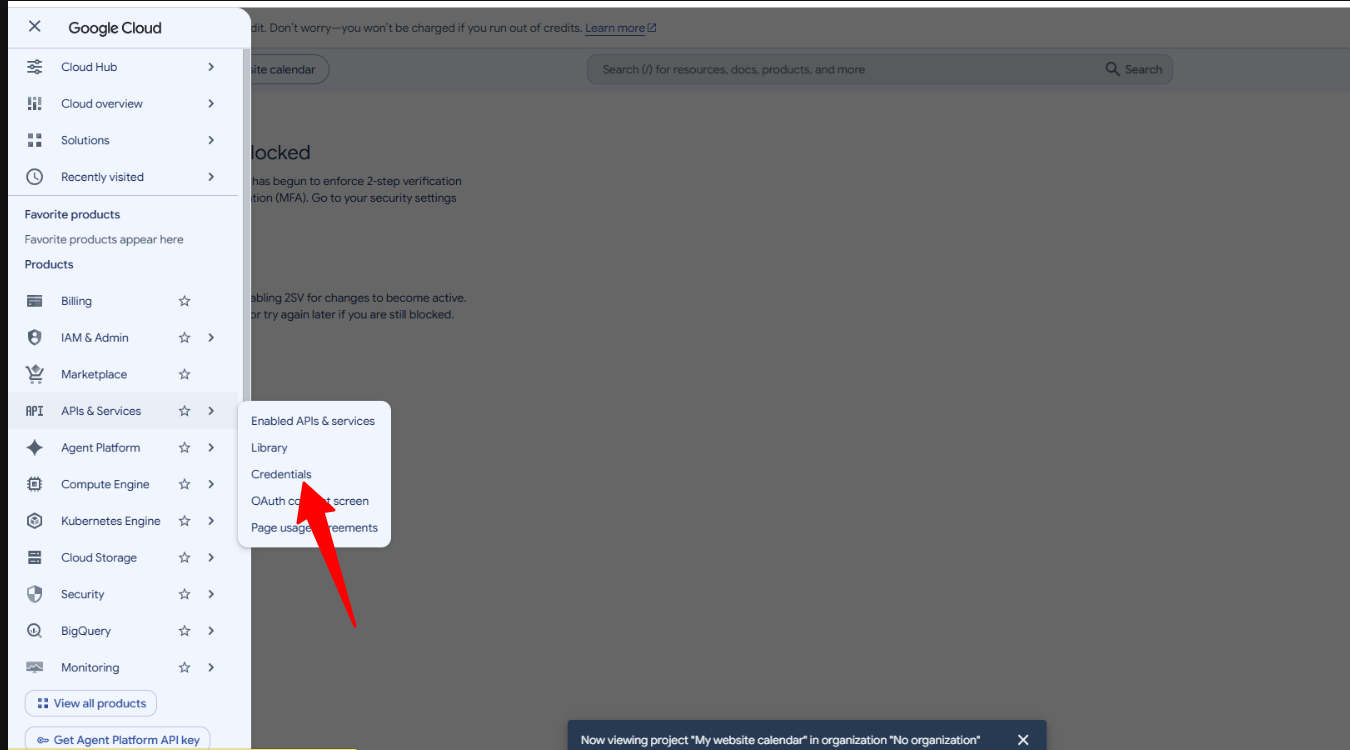
1. In the left menu, click Credentials.
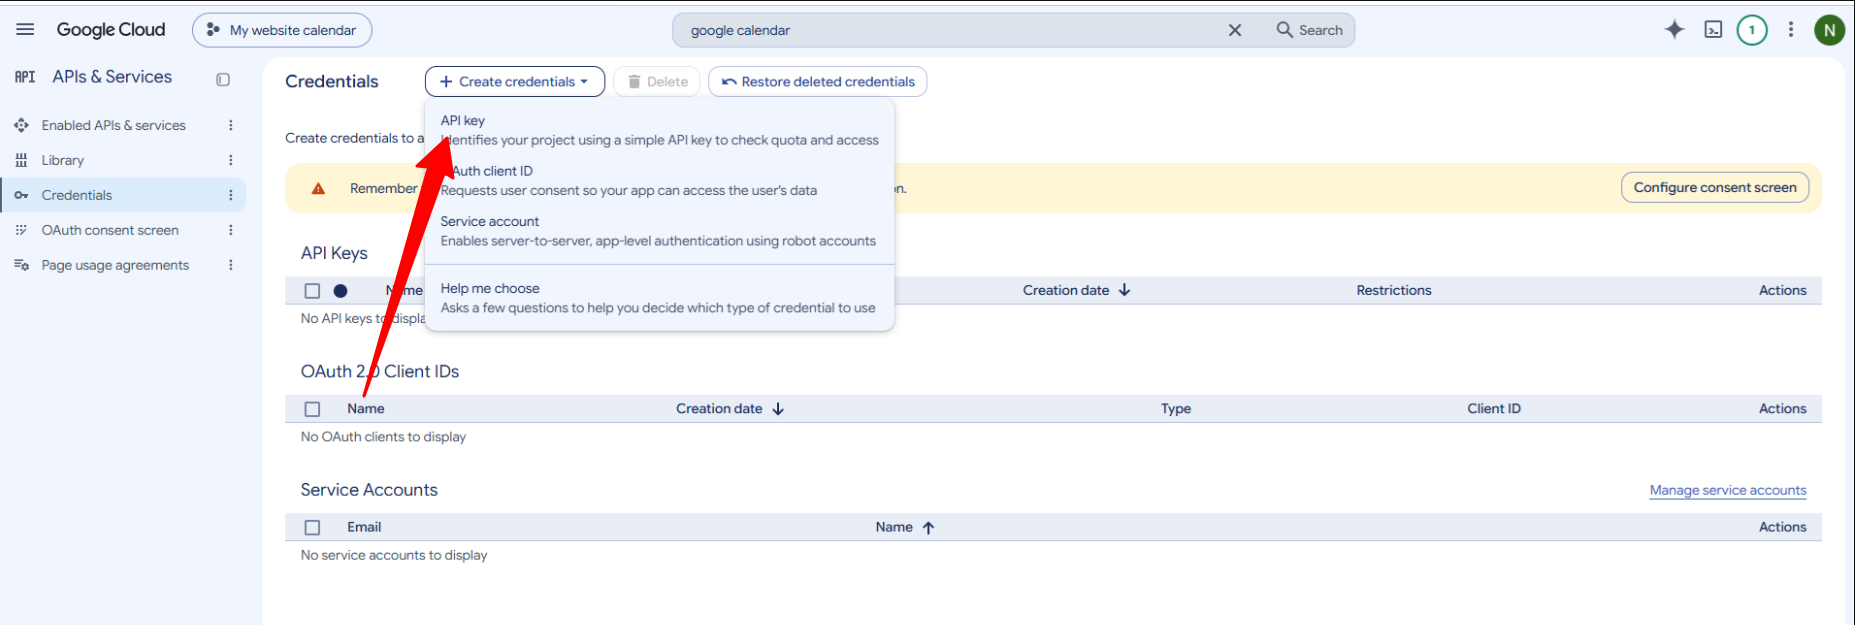
2. Click Create credentials and choose API key.
3. Copy the key from the pop-up and keep it somewhere safe. You can always find it again on the Credentials page.
Optional: Restrict your keys
Google recommends restricting API keys so they can’t be misused if someone copies them. On the Credentials page, open your key and, under API restrictions, choose Restrict key, then select only the Google Calendar API.
However, you should be a little careful with the website (HTTP referrer) restrictions. A referrer restriction may become a blocker, as a WordPress calendar plugin usually requests events from your server and not from your visitor’s browser. So, please remove the restriction if you experience your events disappearing after adding it.
Make your Google Calendar public and find its Calendar ID
Your API key can only read public calendars, so this part matters as much as the key itself.
Step 4: Make the calendar public
1. Open Google Calendar on a computer.
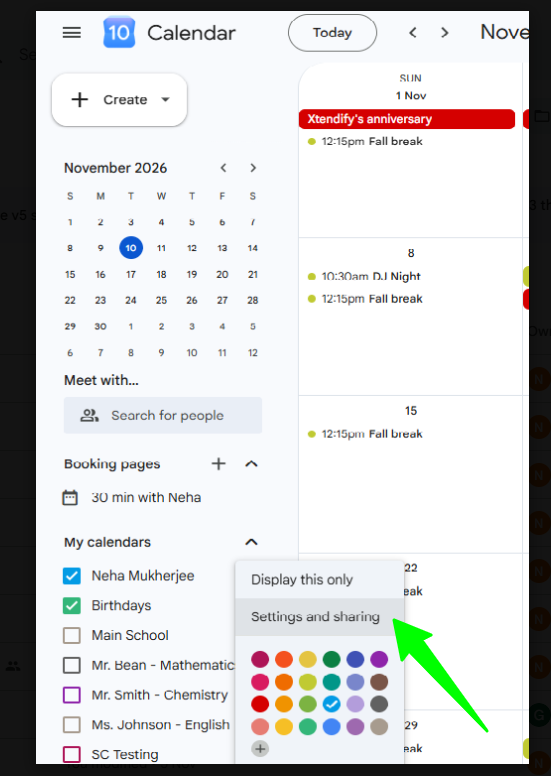
2. In the left sidebar, hover over the calendar you want to show, click the three dots, and choose Settings and sharing.
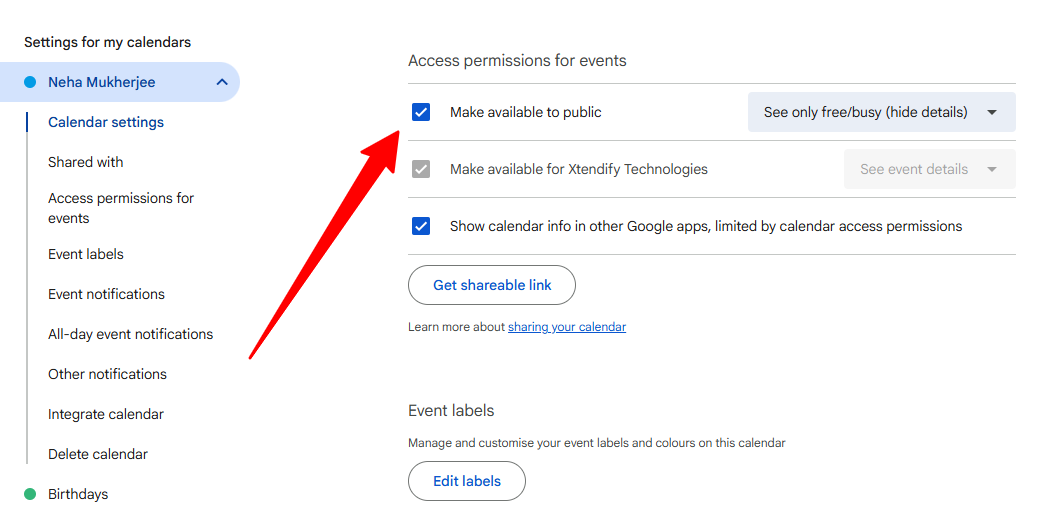
3. Under Access permissions for events, turn on Make available to public.
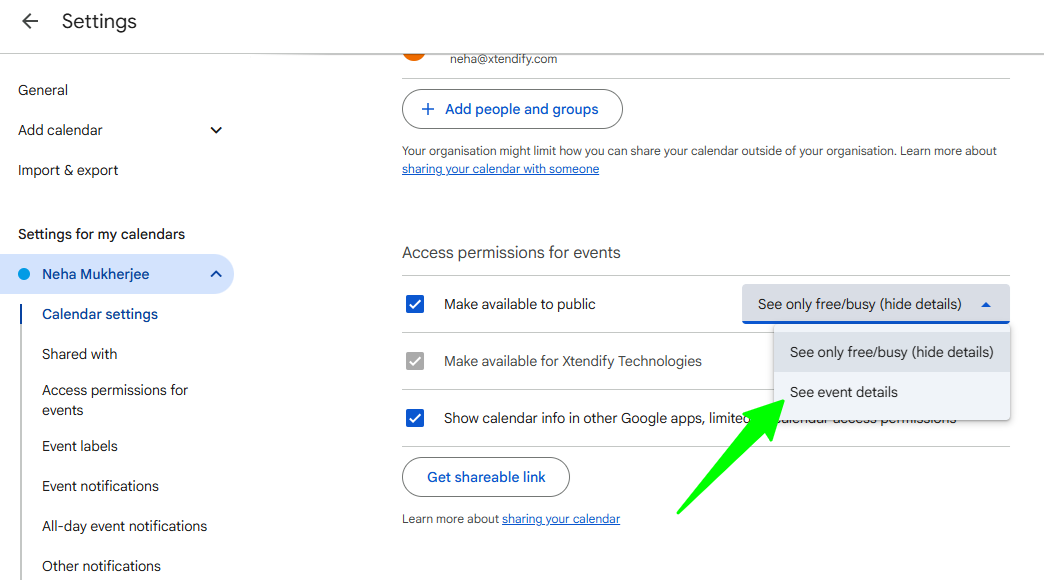
4. Set the dropdown next to it to See all event details. If you choose “See only free/busy,” your site will show busy blocks instead of event titles.
Using a Google Workspace account? Your organization’s admin may have turned off public sharing. If the option is grayed out, ask your admin or use the OAuth method covered below.
Step 5: Copy your Calendar ID
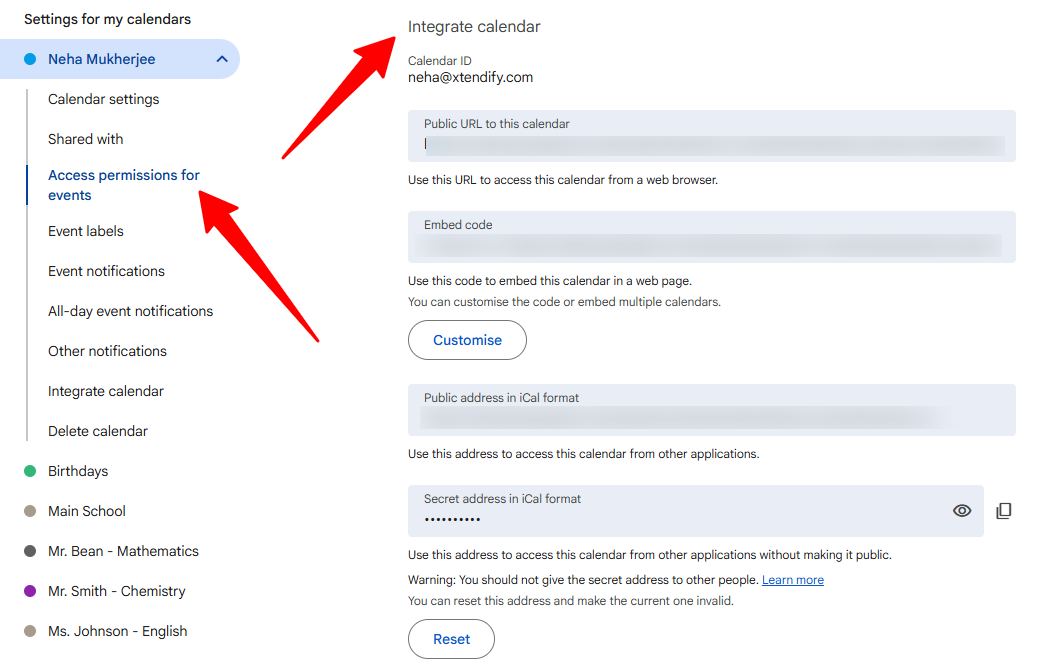
Scroll down to “Integrate calendar” on the same settings page, then copy the Calendar ID.
Add your API key and Calendar ID to WordPress
These steps use Simple Calendar, a free WordPress calendar plugin with 1 million+ downloads. Other plugins that use a Google API key may also follow a similar pattern.
Step 6: Save the API key in Simple Calendar
1. Install and activate the free Simple Calendar plugin from Plugins → Add New.
2. Go to Calendars → Connect.
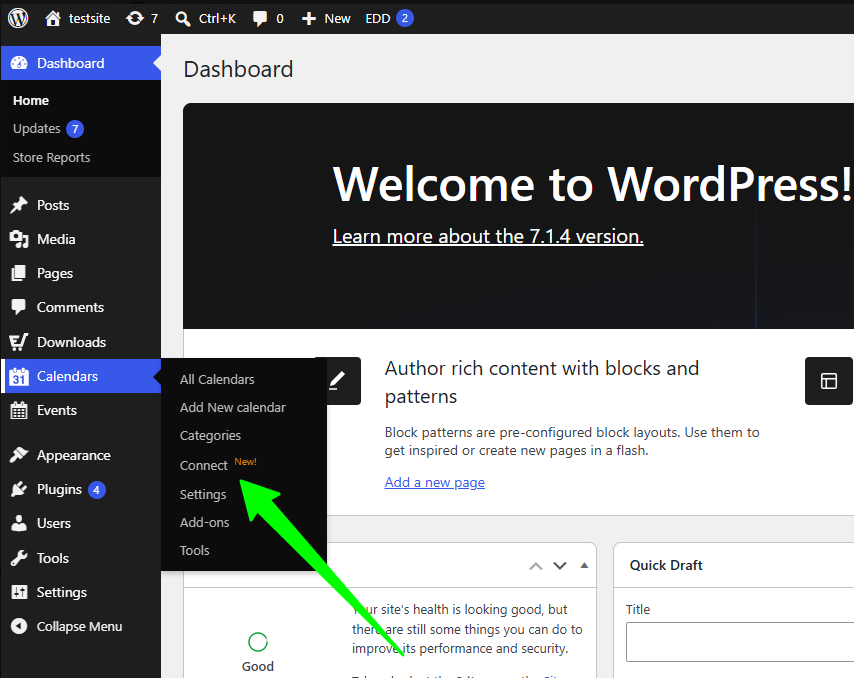
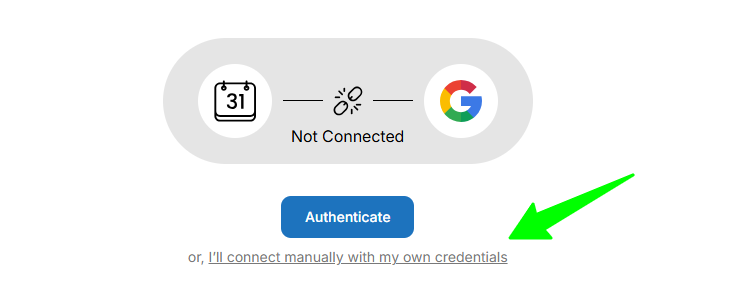
3. Click Authenticate, or I’ll connect manually with my own credentials.
4. Paste your key into the Google API Key field. Check that there are no extra spaces before or after it.
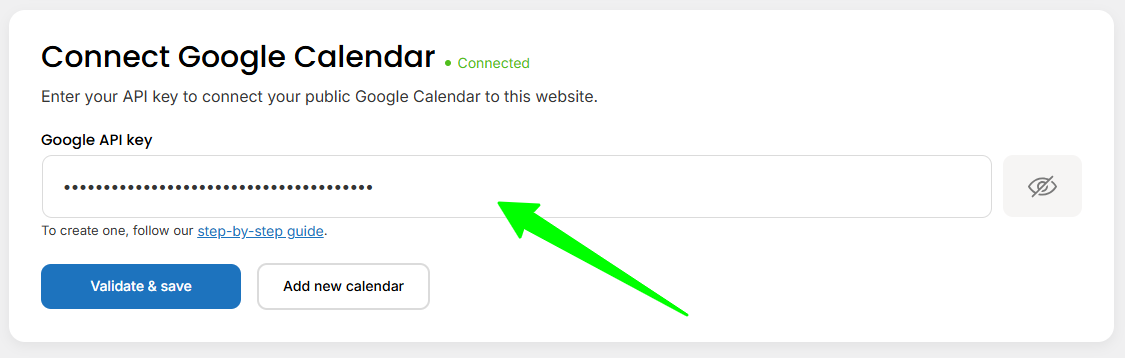
5. Click Validate & Save.
Step 7: Create a calendar and display it
1. Go to Calendars → Add New and give your calendar a title.
2. Set the event source to Google Calendar and paste your Calendar ID into its settings.
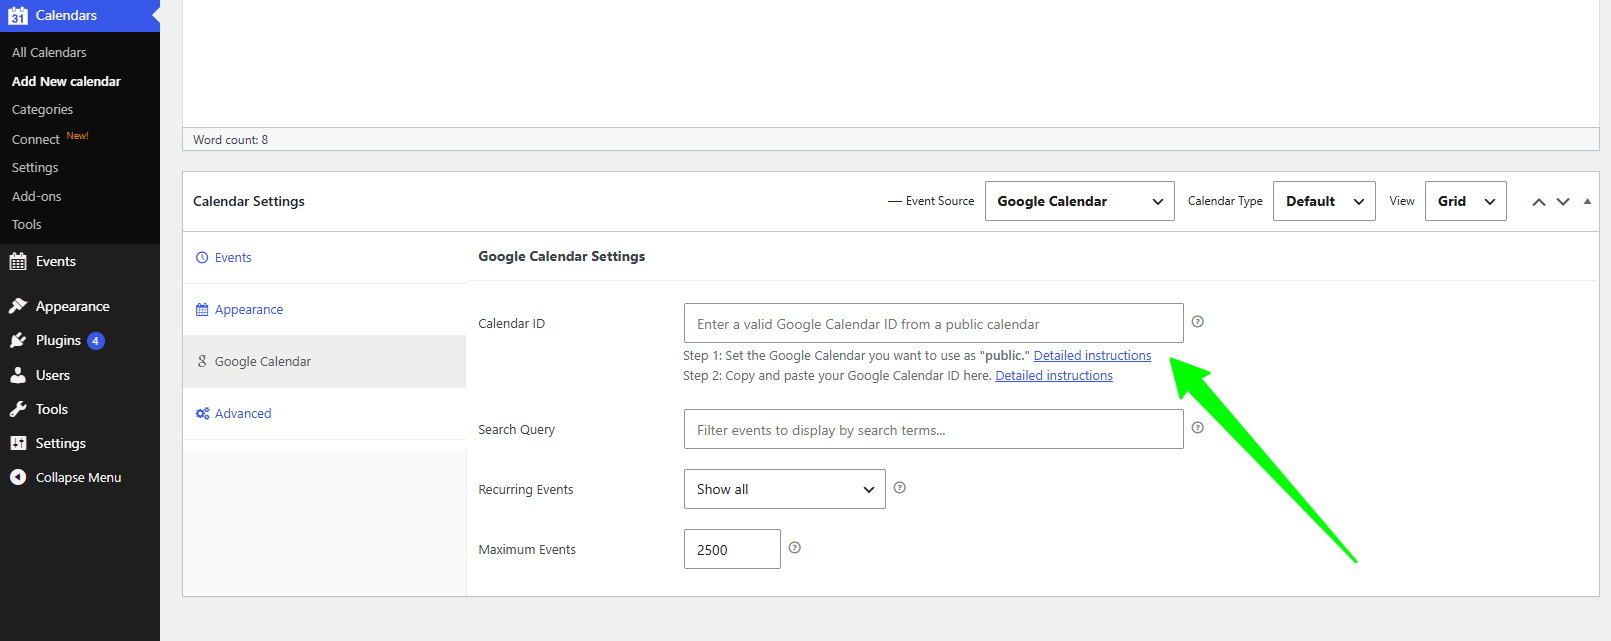
3. Choose a view, such as a monthly grid or a list.
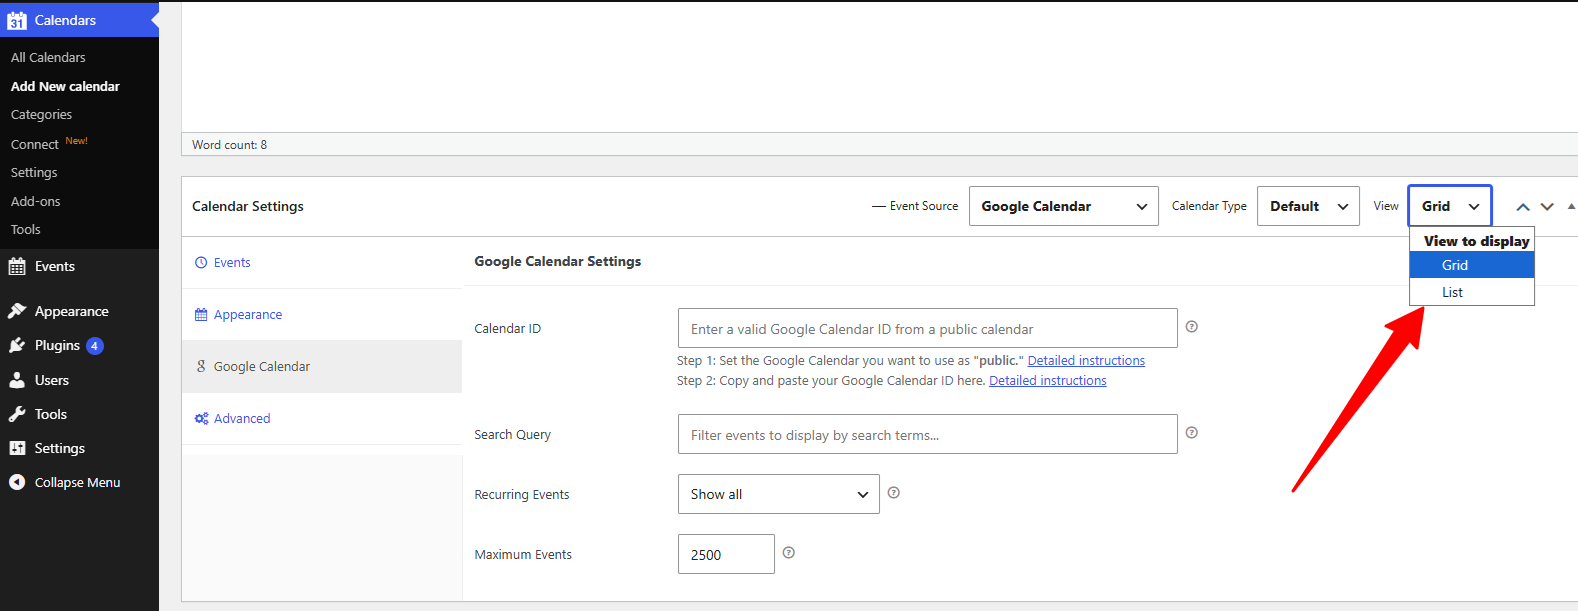
4. Click Publish, then copy the shortcode shown on the calendar’s edit screen.
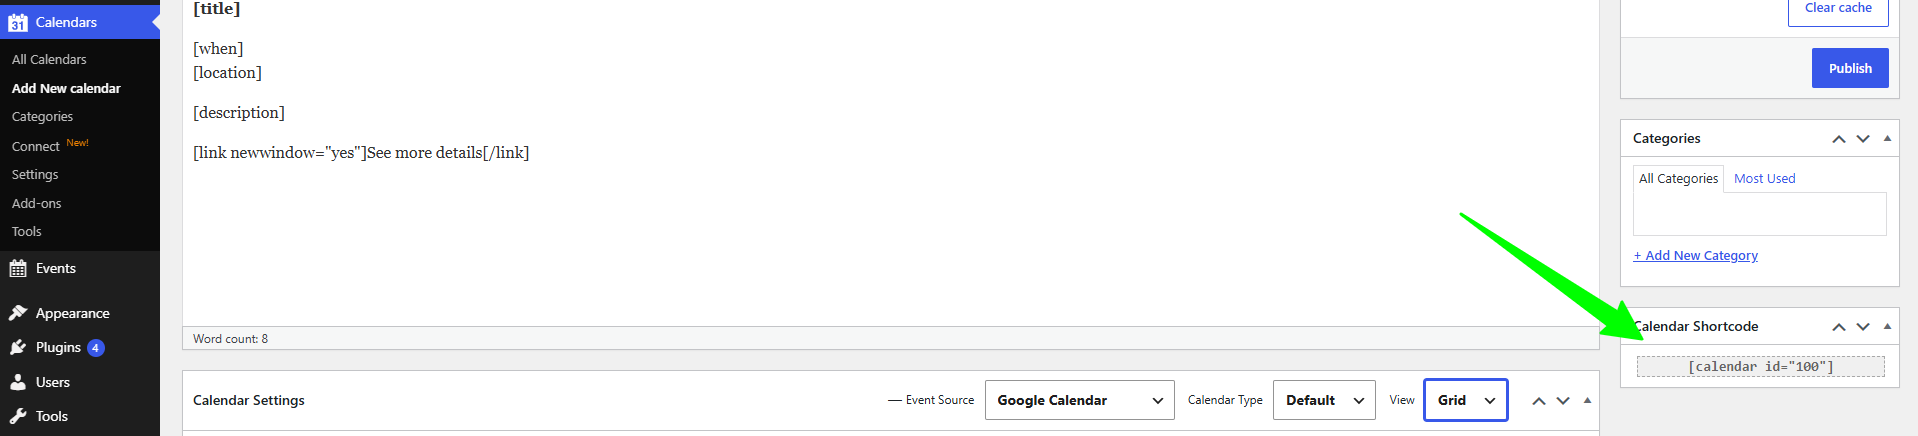
5. Paste the shortcode into any page or post.
Open the page in a new tab, and your events should appear. If you want to change which event details show, such as times, locations, or links, use event template tags.
Google Calendar events not showing on WordPress? Here’s how to fix it
We’ve observed that most ‘events not showing’ problems come down to a handful of causes after 10+ years of handling support tickets. Let’s go through them one by one as follows!
1. You see “Google returned an error”
While trying to connect the calendars and display them, if you see an error notice, it simply means Google is rejecting the request. And, it’s mainly caused by one of the three reasons, such as the calendar isn’t public, the calendar ID is wrong, or the API key isn’t working. Ensure you check and fix these issues first.
2. Some events are missing, but others show
Check the visibility of the missing events. You can set an individual event to Private even when the calendar is public in Google Calendar. Open the event, and set its visibility to Default or Public.
3. The Calendar ID is wrong
It’s easy to copy the ID of a different calendar, especially if you have several. Copy the ID again from the Integrate calendar on the exact calendar you made public, and paste it into your calendar’s settings in WordPress.
4. The API key isn’t working
- Calendar API not enabled: In Google Cloud Console, check that the Google Calendar API is enabled in the same project as your key.
- Extra spaces: Paste the key again, and make sure there’s nothing before or after it.
- Referrer restriction: If you added a website restriction to the key, remove it and test again.
- Still not resolved? Create a fresh key in the same project and replace the old one.
5. Events are outside your calendar’s date range
Your calendar settings in WordPress control the earliest and latest events to show. If your events are further ahead than that range, they won’t appear. So, ensure you extend the range in the calendar’s settings.
6. New or edited events haven’t appeared yet
Simple Calendar saves a copy of your events for a set time before checking Google again. You can change this with the cache refresh interval in your calendar’s settings. If you just added an event and want it on your site right away, click the Clear cache button for that calendar in WordPress.
7. Something else on your site is interfering
If none of the above fixes it, another plugin or your theme may be conflicting. You can temporarily switch to a default theme and deactivate other plugins one at a time to find the cause. Please refer to our docs for troubleshooting theme and plugin conflicts.
How to connect private Google Calendars securely (no API key required)
You need to make a calendar public first to connect it to WordPress via a Google API key. However, the lengthy steps of creating a Google Calendar API key aren’t required for connecting private Google Calendars. You can use an OAuth connection instead for private calendars.
Simple Calendar connects to your private Google Calendar securely with the Google Calendar Pro addon. Google Calendar Pro also connects live ICS feed URLs from Outlook, Apple Calendar, and other apps, and keeps them updated automatically.
So, if you want to skip the technical hurdle of creating a Google API key or going through lengthy steps of creating client ID and secret, you can switch to our Google Calendar Pro addon for technical convenience, provided through one-click integration.
Display calendars on your site
As discussed, Google Calendar API key is a 10 to 15 minutes setup process and may extend further for people with zero technical background. Also, it’s a process to connect public Google Calendars that are indexable and searchable on the internet. You can explore our Google Calendar Pro addon if you want to skip this lengthy API key creation process or connect private Google Calendars securely without the fear of getting them indexed on the internet.
Still choosing a plugin? Our guide to WordPress calendar plugins, compared by use case, helps you pick the right type for your site. Or download Simple Calendar for free and connect your first calendar today.
Summarize with:
Frequently asked questions
Yes. Creating a key is free, and Google doesn’t charge for reading calendars through the Google Calendar API. Google does set usage limits, but Simple Calendar saves a copy of your events between refreshes, which keeps requests low.
No. One key works for all of your public calendars. You only need a different Calendar ID for each calendar you display.
You can, but it’s better to create a separate key for each site. That way, if you ever need to delete or replace a key, only one site is affected. However, you can create several keys in the same Google Cloud project.
No. An API key can only read public calendars. You can access a secure OAuth connection with Google Calendar Pro to connect and display your private Google Calendars.
It might be due to the settings you’ve already set of individual events in your calendar. You can easily fix this by changing the settings. Open Settings and sharing in your Google Calendar, and change the public access option to See all event details.
Yes, it’s safe to add API key to WordPress as it can’t access your Google account or private data. However, you also have the option to restrict the key for extra safety.
Related posts
Simple plugin. Pro features. Easy from day one.
We read the top 10 Google results for ‘best WordPress calendar plugin’ in September 2026. 8 of 10 recommended an event-management plugin to readers who only needed a display. But you already know it’s not enough for the specific choice you need to make. And that advice generally falls apart when you realize that each […]

How to Easily Integrate Google Calendar in WordPress Website Maintaining crucial tasks and event calendars plays a huge role, irrespective of the field in which you work. People no longer write down every big and small event that is likely to appear on a paper-based calendar because online calendars are now the more convenient option. […]

Learn how to add customized Google Calendars to your WordPress in 5 minutes. Easy and flexible setup.